Most Popular Articles


 "I've booked my session and I'm excited for the shoot but have no idea what to wear." I hear this all the time. Whether this is your first shoot or your 5th, what you choose to wear to your photo session is just as important as the lighting, posing and location. Wardrobe may seem like a no brainer but If you show up under dressed or completely avoid the guidelines below you could take away from what could have been a great photo. The last thing you want is your clothing to be a distraction. 27 Posing Ideas for Women Who Aren't Models The tips below are specifically for portraits, lifestyle and head shots. If you’re doing a fashion shoot these won’t apply to you as fashion is more about wardrobe and less about the model. Just remember there is an exception to every rule. If you decide not to read on just make sure to read this: The most important tip I can give you is wear what makes you feel comfortable and confident. Let me know in the comments below if this article helped you or if there is anything I should add to this list. All photos below were taken by me except for the memes. Make sure to connect with me on Instagram HERE 1. Wear what makes you feel Awesome. As I mentioned above I will start with the most important tip of all. Wear what makes you feel confident because if you don’t feel confident it will always show on camera. Try your best to follow the rules below but at the end of the day what makes you feel comfortable and confident is the most important. I would rather you break the rules with an outfit that makes you feel amazing than the other way around.  Model: @kaleo_rav3 on IG 2. Avoid bright colors. Keep in mind that bright colors like orange, yellow, and red tend to make you look larger than you actually are and bright and fluorescent colors can be reflective and don’t photograph well. If you would like to wear lighter colors I would stick with pastels. Below is an example of great pastel colors to look for. These are great for dark locations like a forest. If the background will be dark than dark clothing should be avoided. This is why you should always discuss location with your photographer before choosing your outfit.  3. Avoid prints, patterns, and graphics. Again, unless you’re modeling for a brand or making a statement, patterns, prints, and graphics are to be avoided. We don’t want anything that’s going to distract from your beautiful face.  4. Bring options. Lots of options. It’s never a bad idea to bring more outfits than you need on the day of a shoot. Men: Bring different ties, different shirts, different suit jackets. For casual headshot sessions or actor headshot sessions, bring a basic soft tee and long sleeve shirt. Variety is king and hopefully your photographer offers multiple wardrobe changes. Your photographer should let you know how many outfits are included in your price and if they don’t make sure to ask.  5. Wear flattering clothes that fit well. I know this one seems obvious but you would be surprised. Wear clothes that fit you well and flatter your figure. If you’re going to shop for an outfit for the shoot don’t wait till the day of to try them on. Ladies: make sure to bring at least one dress to your session. I recommend dresses with a thicker material that will fight off wrinkles better than thin material. 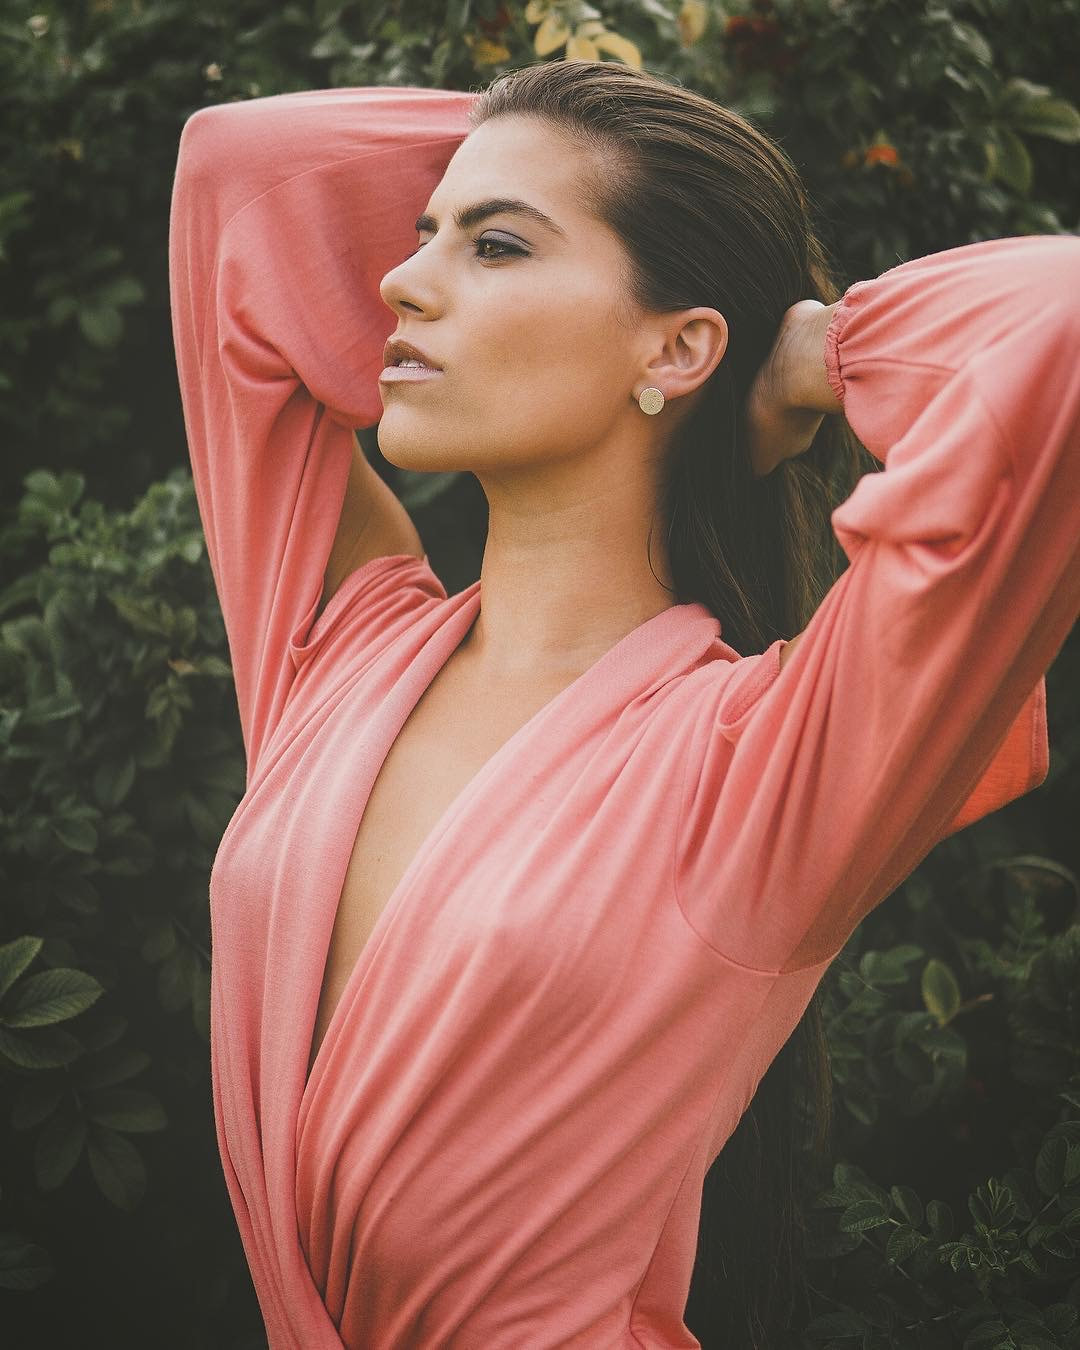 Model: @jacquelynnefaith on IG 6. Choose clothes that cover your skin. Arms and legs have a larger surface area than your face which means when they are showing they can take away from the face, to avoid this I suggest long sleeve shirts, long pants, or a skirt that goes below the knee. If your self conscious about your arms and or legs this is the best way to help draw attention away from them and onto your face. obviously this one won’t apply to you if do you want to show off your arms or legs. 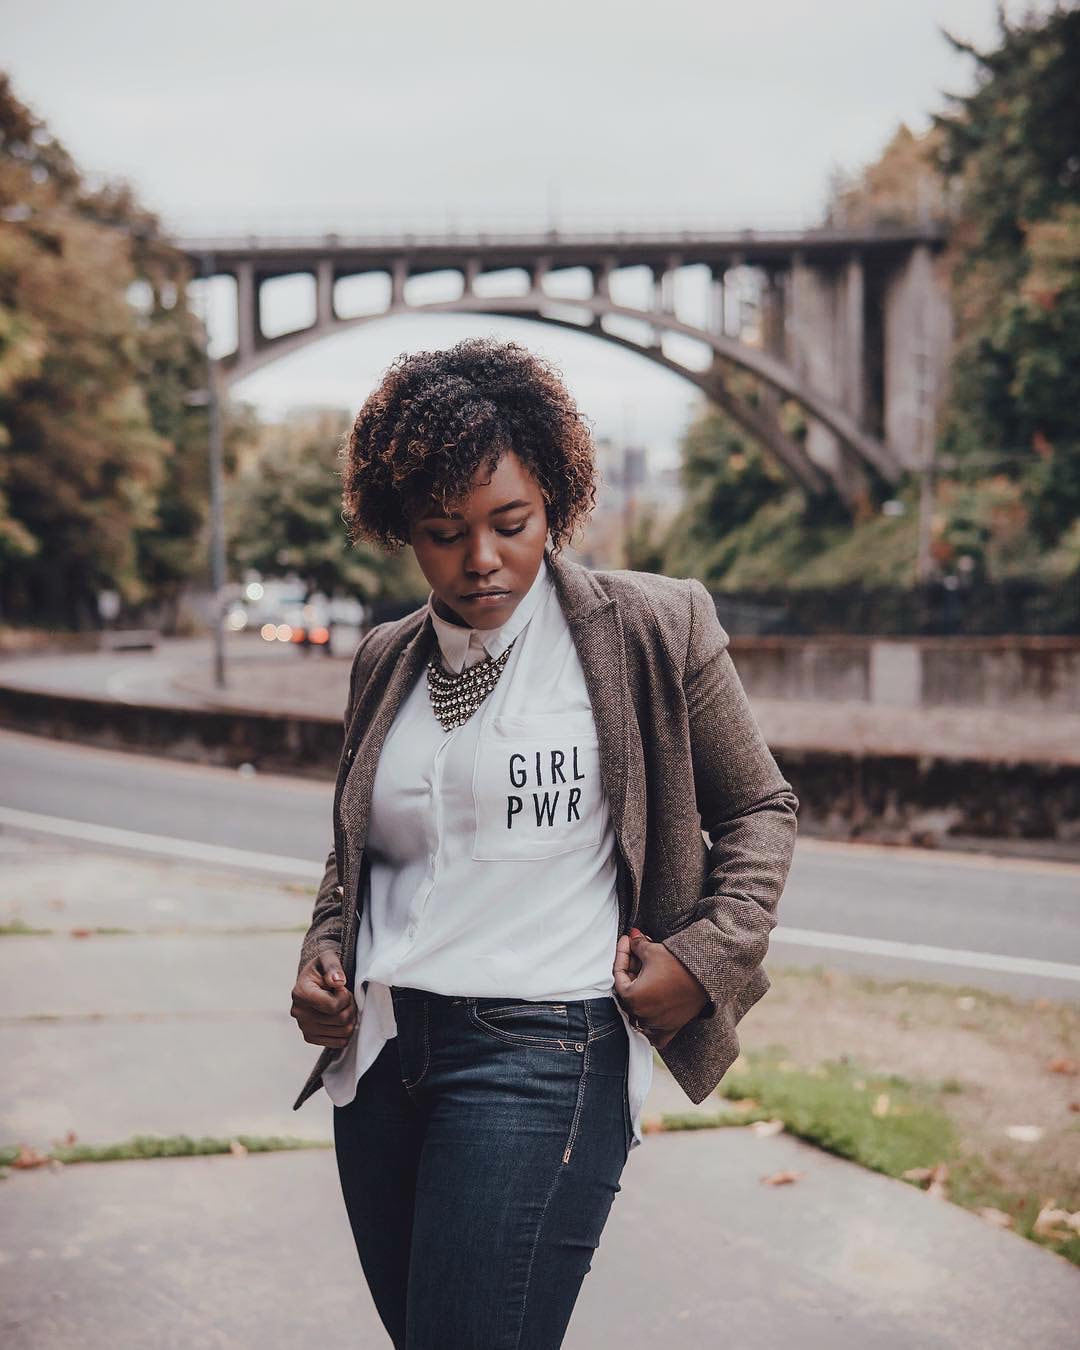 Model: @anisamarieyee on IG 7. Go with a narrow neck line. It’s been said that a wide neckline can thicken the neck in a photograph. I'm not sure this is true but to avoid this I suggest wearing clothes that come close to your neck such as a turtle neck or V-neck top because they slim you down and frame your face and tend to be the most flattering neck lines. However if you have really nice collarbones I would suggest a wide neckline. 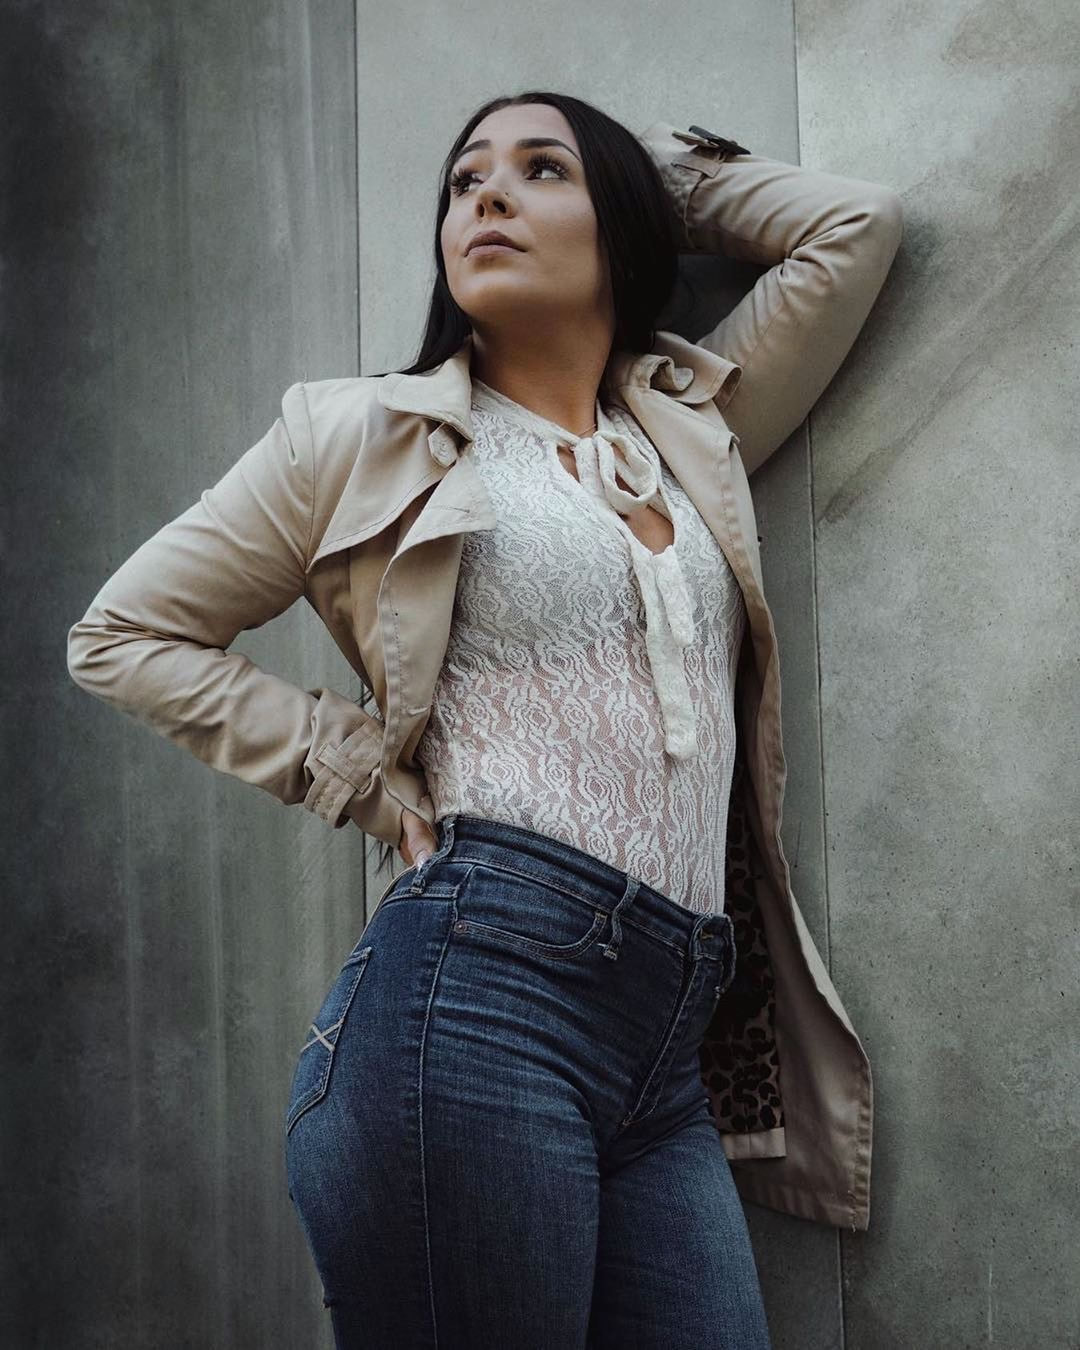 Model: @kaylaraecannon on IG 8. Wear muted, Jewel, or Earth tones. I always suggest going with muted, jewel, or earth tones to my clients because they don’t draw attention. The more subtle the better however if wearing something really loud fits your personality better that’s okay too. Below are some examples of muted, jewel, and earth tones I'd look for when putting an outfit together. 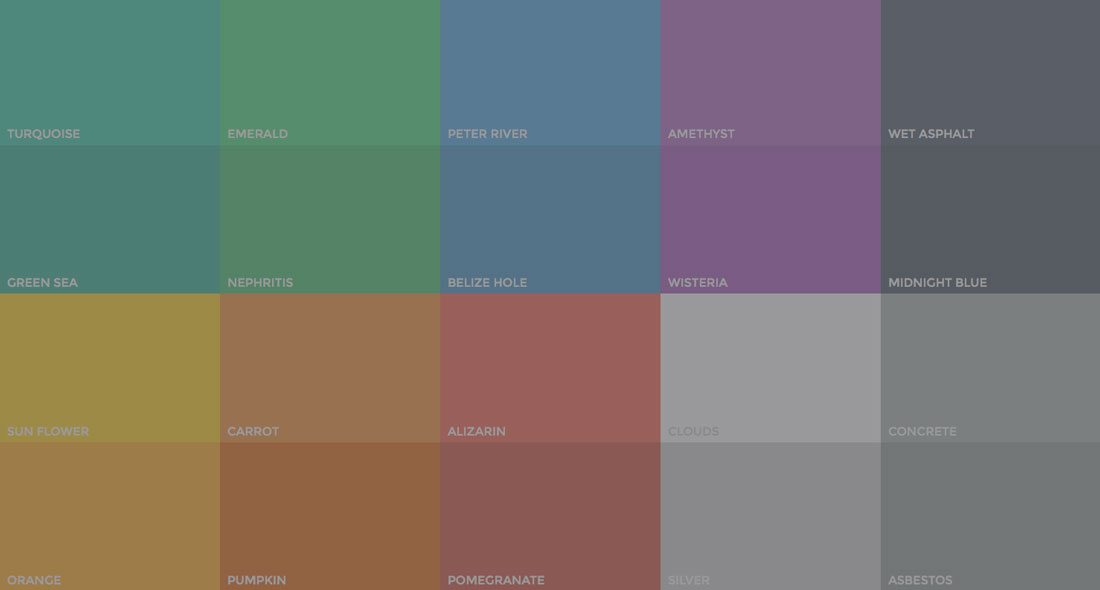 Muted Tones  Jewel Tones 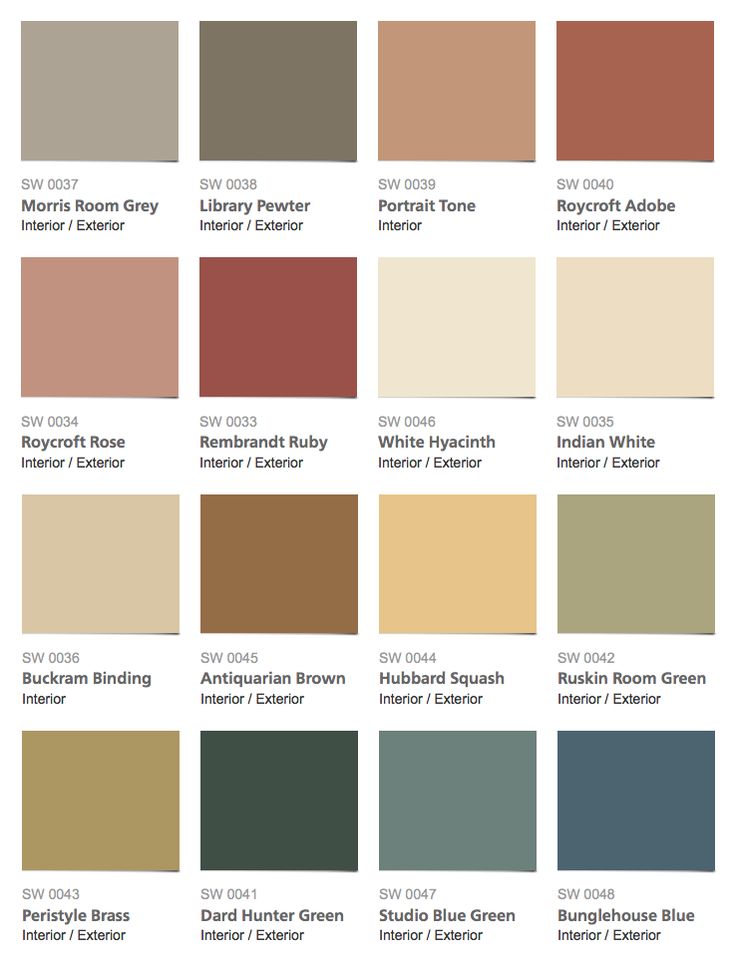 Earth Tones  Emo Tones 9. Keep to solid colors. As you can probably tell, our main objective when choosing what to wear is to pick clothes that don’t draw attention to itself. Choosing an outfit with solid colors is always a great choice because they’re not overbearing or distracting. I hate to beat a dead horse but I really want this to sink in. Yes black is okay as long as the location isn't dark. Keep in mind darker colors are more slimming than lighter colors. 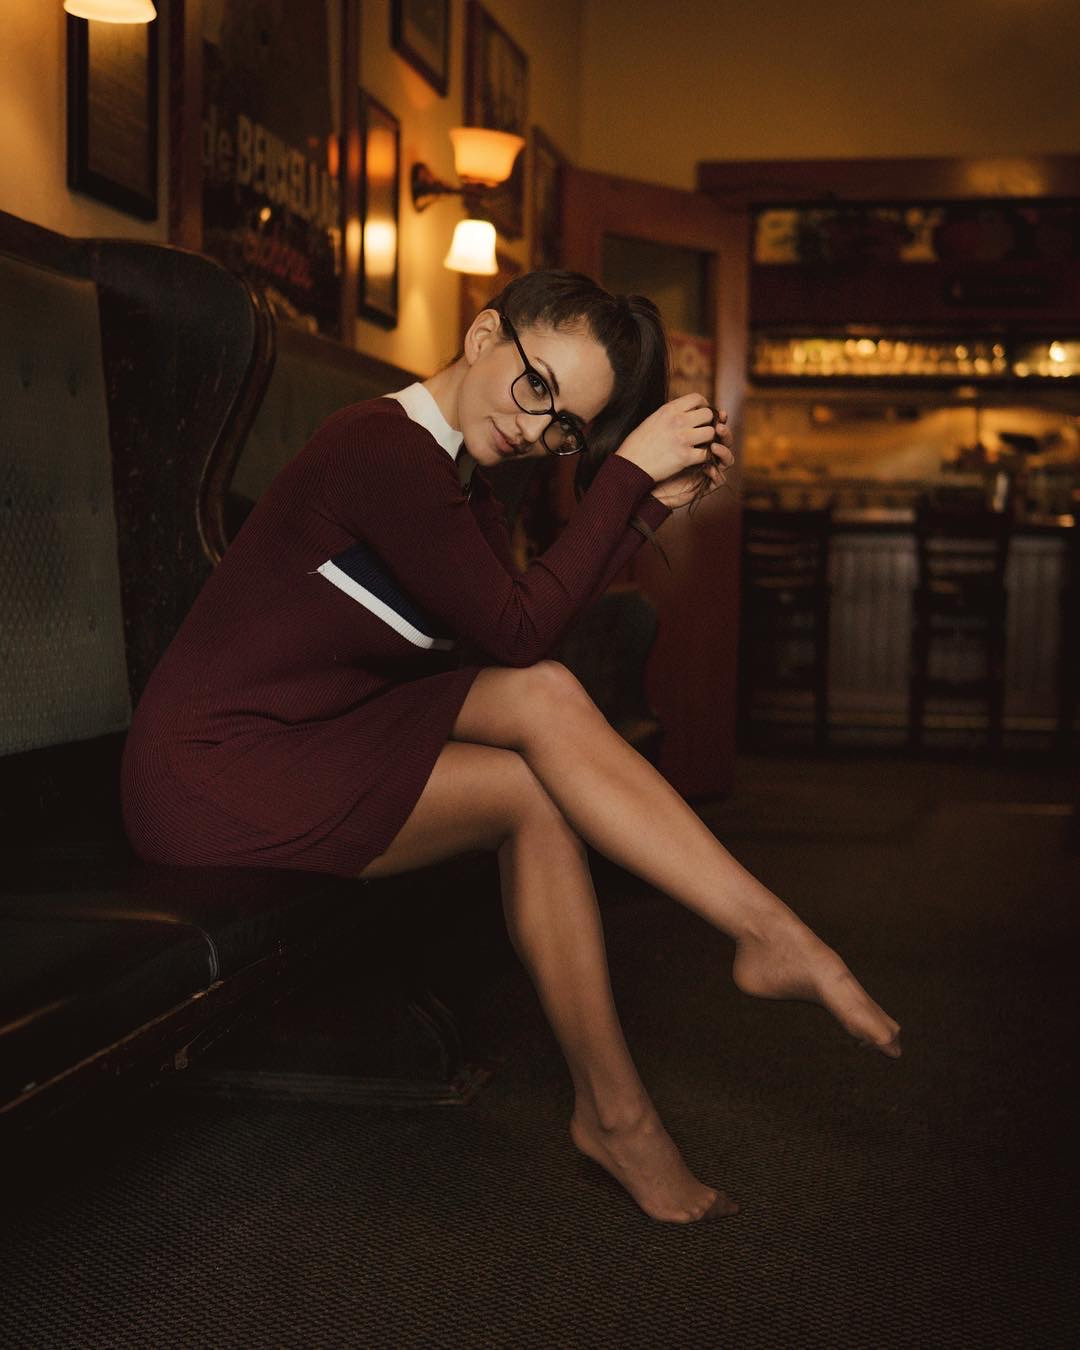 Model: @waterfallkristy on IG 10. Choose your outfit first. This is specifically for family portraits so mom and dad it can be extremely helpful to choose what you want to wear first and then build the rest of the family’s wardrobe off of that. Make sure your outfits coordinate but don’t match. 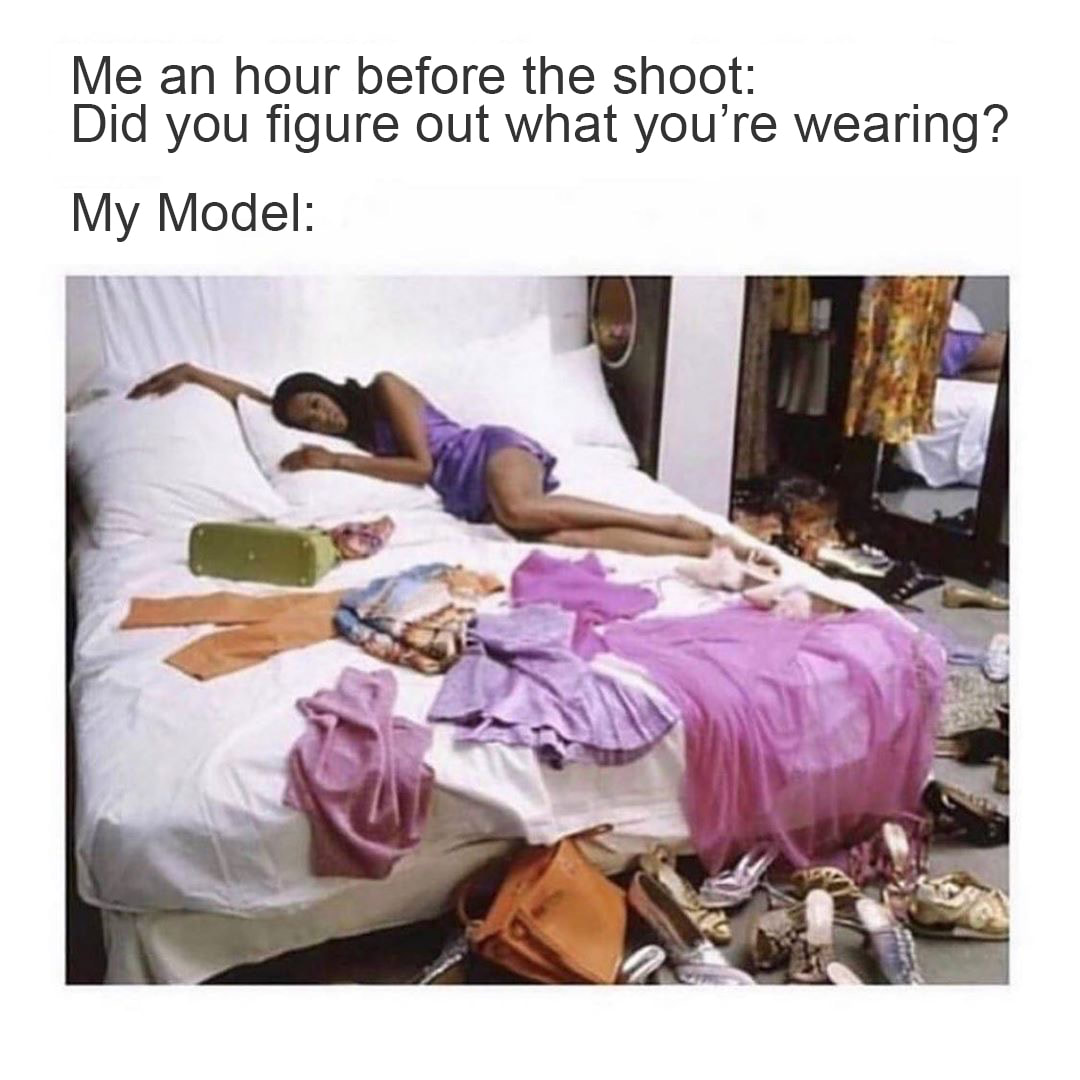 11. Dress for location and season. When choosing an outfit keep in mind where you will be shooting and what the weather will be like as I said before it’s extremely important that you are comfortable so you wouldn’t want to wear a sleeveless in the dead of winter and you probably wouldn’t want to wear a turtleneck in the middle of summer. Dress for the season. If it’s cool and crisp out make sure to layer up. Pinterest is a great place to look for examples. 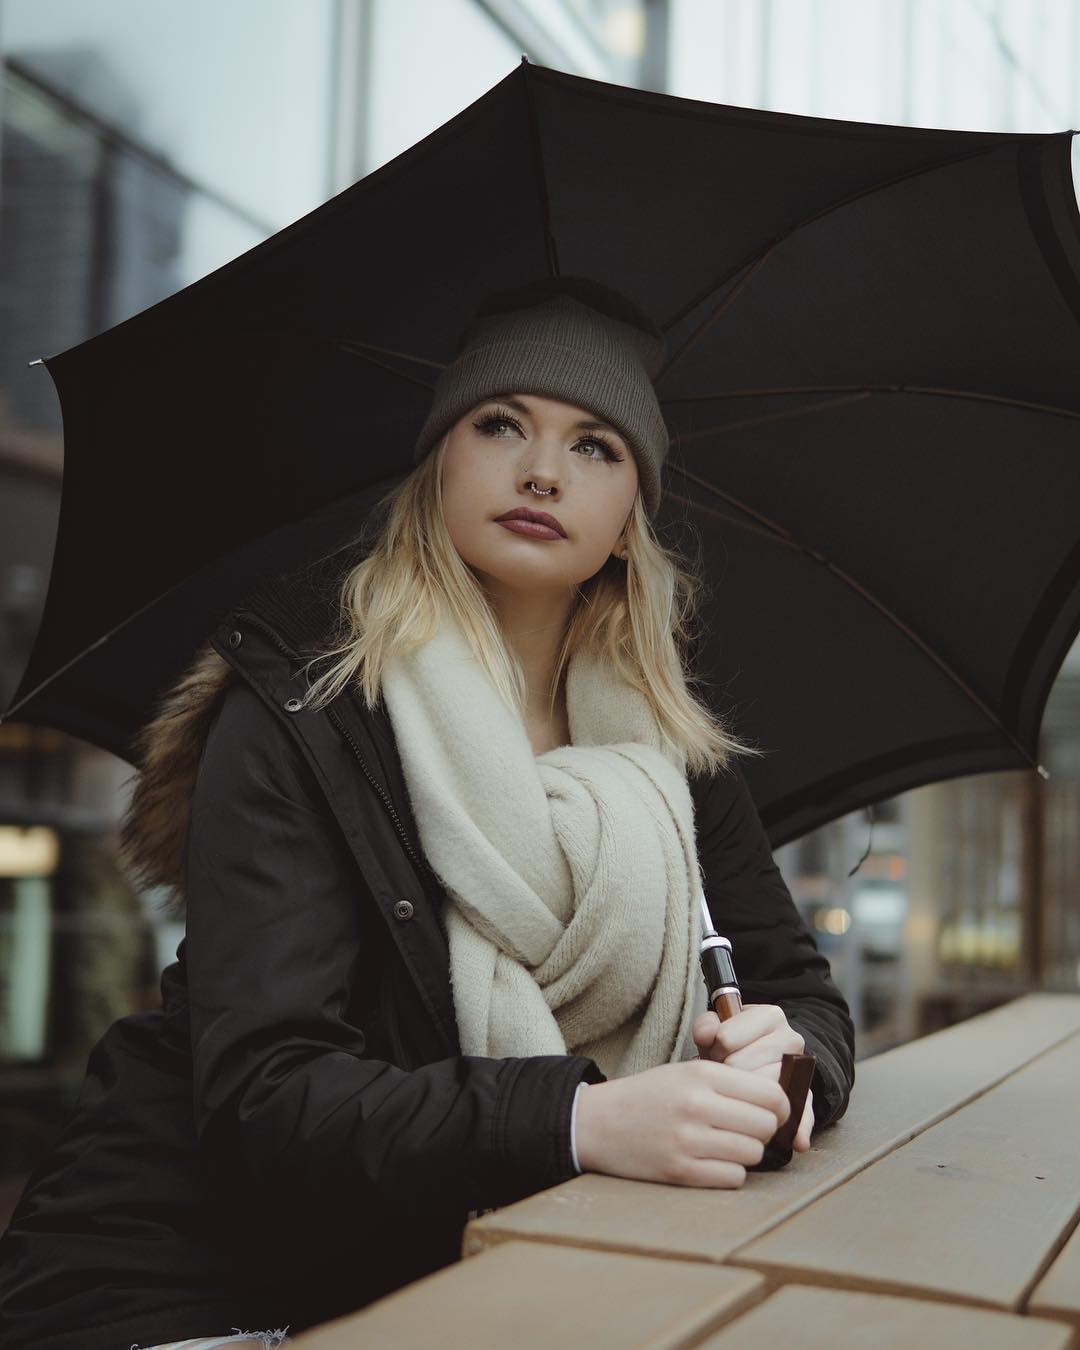 12. Have a clothing option with movement. This one’s really for the ladies. I recommend flowy dresses, skirts, or scarves. These are great for movement shots like dancing on the beach.  Model: @becka.888 on IG 13. Jewelry is fine. A beautiful necklace, set of earrings, bracelet or hat can go a long way as long as they aren't too distracting. And for the men a watch is always recommended. A nice hat works as well for an old 50's vibe. Hair, makeup, and so much more. It is perfectly normal to want a haircut right before a shoot you’re paying good money for. But try your best to have it done 2 weeks before the shoot. A fresh cut or fade generally looks better after a week or 2 has passed and you’ll know how to style it just right in case you changed your hairstyle. The day of your shoot is not the time to try a new hairstyle. Stick with a look that you know you like. Try to cover up any blemishes the best you can but keep your make up simple and minimalistic. You don’t want your photos to look like 90s glamour shots. A small amount of eyeliner, mascara, foundation, powder, concealer, blush, little eye shadow and subtle lip color goes along way. If you'd rather leave hair and makeup to a professional I work with an amazing Hair and Makeup Artist Renée J. Beauty who you can contact HERE 27 Posing Ideas for Men Who Aren't Models The last thing you want are dry chapped lips so bring lip gloss, lipstick or lip balm to keep those lips nice and soft. Typically I have my clients remove glasses for photos but if no one will recognize you without your glasses I recommend wearing them. However a little trick I like to do is having my clients remove the lenses from the frame because reflections in a lens can ruin a photo. This is an old Hollywood trick ;) Gentlemen, if you are going to show up freshly shaven make sure to use aftershave moisturizer to limit bumps and redness. If you have a beard keep beard dandruff under control by using a good beard oil before the shoot so your beard looks nice and healthy during the photo session. And Keep some Beard Balm or Styling Gel-Pomade on hand to keep those fly away hairs in check. Keep your nails clean and tidy, this will make a huge difference in photos if your hands are showing. Go with a neutral color that won’t clash with your outfit. Final thoughts. If you take anything away from this article just remember to keep it simple, stick to solid colors so your outfit isn’t the first thing that’s noticed. Flatter your shape, wear something that fits and shows your figure well. Keep it relaxed and natural, your clothing, make up, and hair should be natural and have your hair frame your features. If shooting with a group make sure to coordinate not match, plan your color palette and the vibe you’re going for. It’s best to view the outfits together before hand.
The 10 best websites for Cosplay Costumes & Props Don’t wear graphics or distracting patterns. Don’t dress too casual unless the session calls for it, typically a photo session is a special occasion, so wear your Sunday’s best. Coordinate your outfits a day or two before the shoot. It’s easy to think that wardrobe is a no brainer but you’ll be scrambling on the day of your shoot if you don’t coordinate your outfit and decide to wing it. certainly don’t wait until the day of your shoot to try a new outfit for the first time or style your hair and make up a new way for the first time. Most importantly be yourself. The guidelines above are just that, guidelines. Ultimately wearing what makes you feel comfortable and confident is the most important guideline of all. If all of this is too overwhelming and you would rather just let someone else take care of wardrobe for you I always suggest a stylist. And my go to stylist in the area is The Luggage Cart. Alix is the best Wardrobe Stylist I know. Contact her for a free consultation HERE
0 Comments
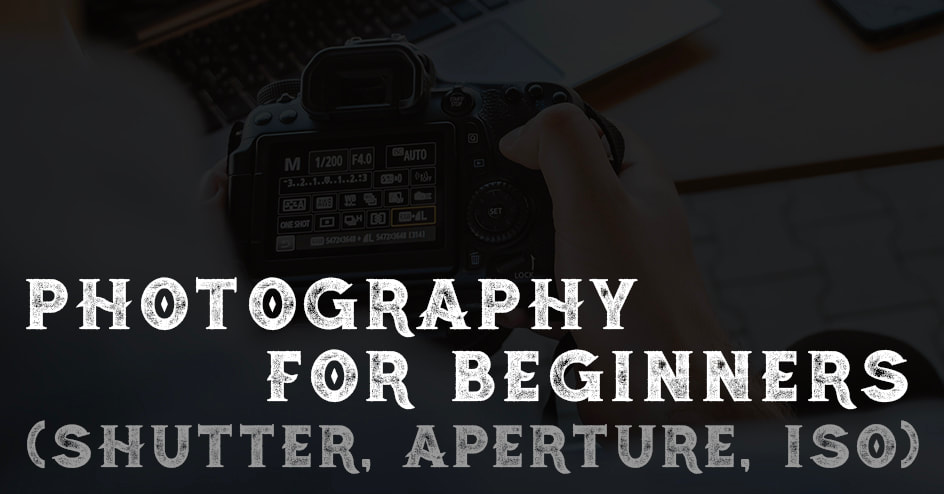 Photography For Beginners (Shutter Speed, Aperture/F-stops, and ISO) Perhaps the most important part of photography is exposure. And no I don't mean likes on Instagram or shares on facebook. We will talk about that kind of exposure in another article. I'm talking about how you expose your photos in camera before you ever click the button. It doesn't matter how good your camera is or how good the composition is if your exposure is off it can ruin a great photo. I would know because I've done it many times. Of course if you're shooting in RAW like you should be than you can recover a poorly exposed photo with software like Adobe Lightroom. But even Lightroom can only go so far. If your photo is too over exposed you can't save the highlights and if your photo is too underexposed you cant recover the shadows. It's best to expose your shot how you want it before you take the photo and to do so you'll need to know the 3 basic elements of exposure: Shutter, Aperture, and ISO. 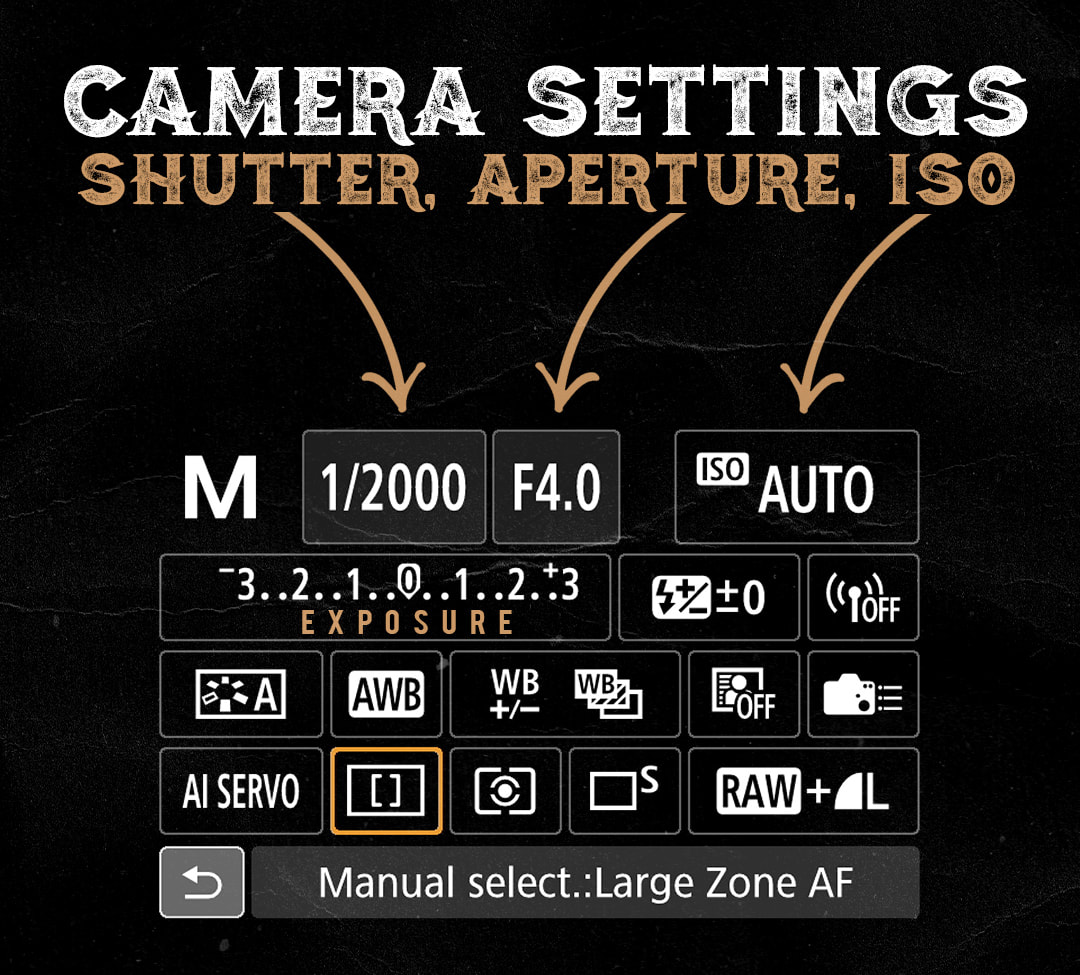 For the sake of time I'll assume you've located the shutter, aperture, and ISO buttons on your camera, if not, the photo above might help locating them in the menu however every camera is different. This article is specifically for shooting in manual mode. I know for a new photographer manual can seem scary but if you just learn these 3 elements of photography you'll elevate your game ten fold. Below is a cheat sheet to help you but I'll explain each one in depth below. 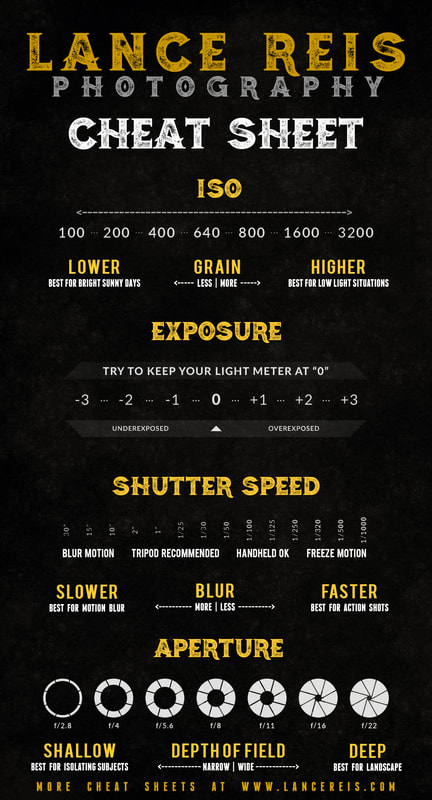 ISO I won't bore you with the mechanics of each element. My goal is to make this as short and easy to understand as possible. All you need to know about ISO is the Higher the number the more light your camera will bring in. But there's a caveat to ISO you need to know. The higher you go the more grain you will get. However grain isn't necessarily bad. Some photographers want that grainy look. That's their style. But if that's not the look you want it's best to keep your ISO lower than 1,000. That being said every camera is different and new cameras can go much higher with less grain than the older ones. For instance my SonyA7iii can shoot with ISO at 1,000 with no noise but my older SonyA6000 could only shoot at ISO 500 with no noise. It's best to play around with your camera in a dark location and find the sweet spot for your specific camera. Open the photos in light room and check the histogram to see what settings you used for each photo. Find the photo with the highest ISO but still has little to no grain. Remember that number and try your best to avoid going over it Last thing you want is to find out you just did a shoot for a client and all your photos are too grainy.  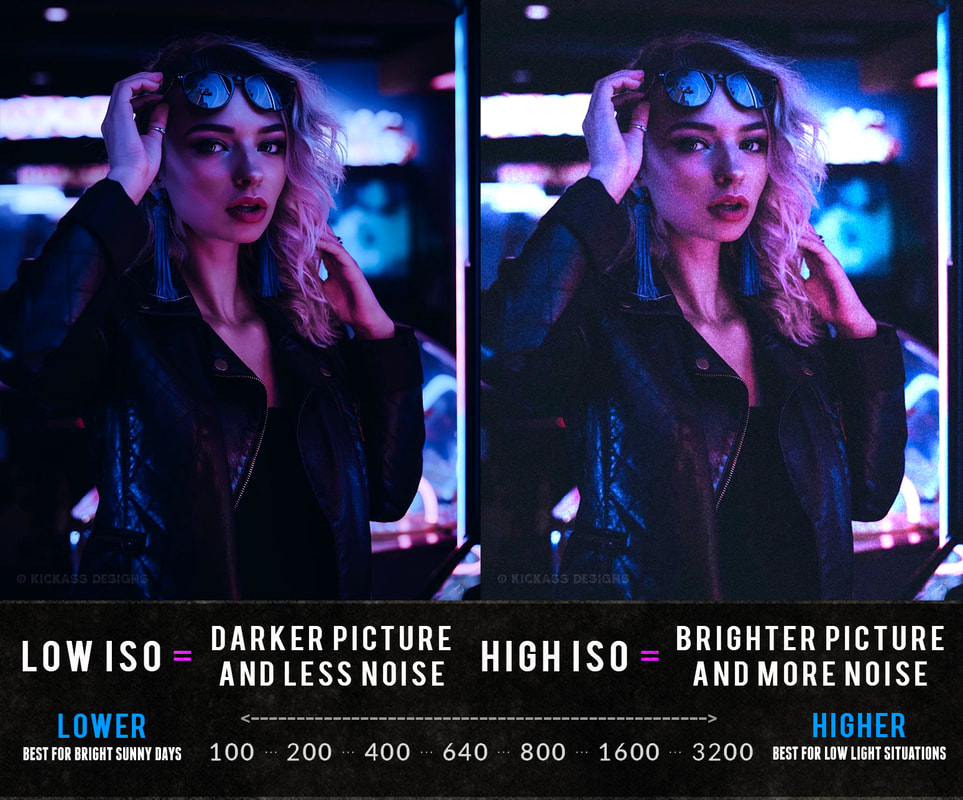 Aperture Aperture is a set of small blades that create a hole that determines how much light is let into the camera. The wider the hole the more light that comes in. The size of this hole is measured by F-stops. A large F-stop like F-22 means the hole is very small, and a low F-stop like F/2.8 means the hole is wide open. So the higher your F-stop the darker it will be and the lower your F-stop the brighter it will be however brightness and darkness aren't the only thing the changes when you adjust your aperture. Aperture also controls depth of field. Depth of field determines how much of your photo is sharp and in focus and how much is blurry. A low F-stop like 2.8 is very narrow and will only focus on a specific part of the image while leaving everything else blurry. The closer you get to your subject with a small F-stop the more narrow the focus will be and thus the more blurry the background will be. A low F-stop is how you get that creamy background and beautiful bokeh effect with the lights in the background. Just keep in mind if you're shooting portraits it's extremely hard to get the eyes both in focus and everything sharp at a low F-stop like F/1.4 or 2.8. I find F/4.5 is best to get everything on your subject sharp and in focus. If your photographing a beautiful landscape or group of people however you will want a large F-stop like F-11 or F-22 to make sure everything and everyone is in focus. Every lens is different and will determine how low you can go and how sharp an image looks at low aperture. My favorite lens in the Sony 85 MM 1.8 Prime  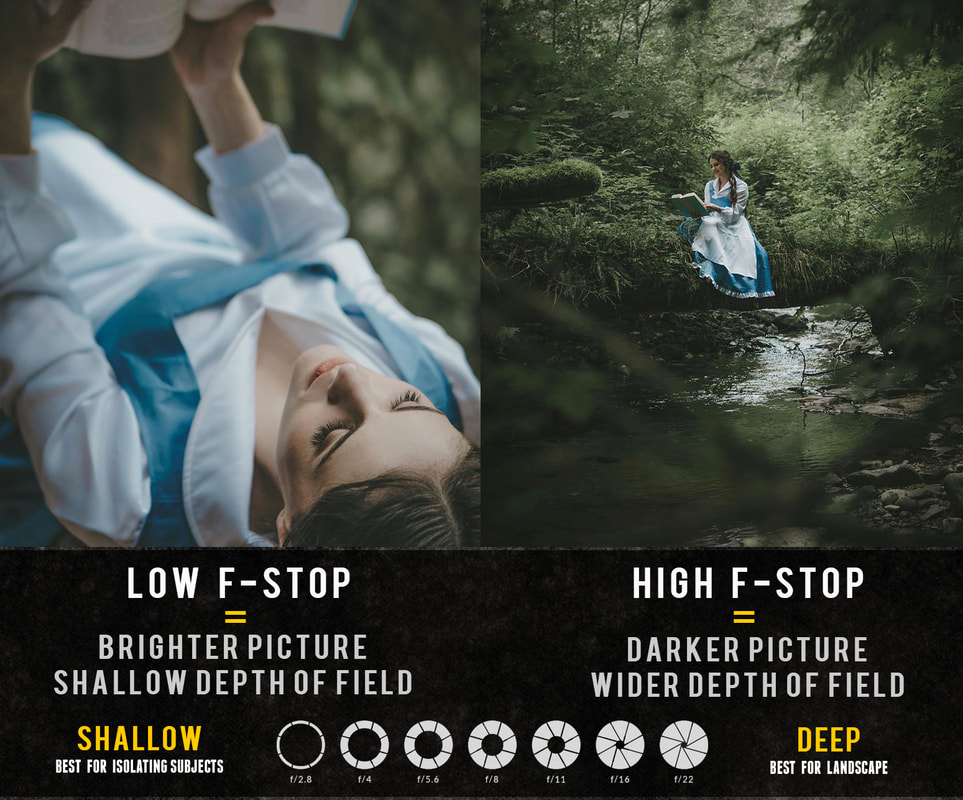 Shutter Speed Without getting technical all you need to know is the lower your shutter speed the more light is let into the sensor and thus the brighter your image will be. The caveat for shutter speed is this: The lower you go the more sensitive your camera gets to movement and thus the blurrier your photo will be if any movement is involved. This means movement of the camera itself and the subject you're photographing. I highly suggest if you go under 1/100th of a second you use a tripod because anything below that and your camera will detect movement and the photo wont be sharp. Just remember your shutter speed effects brightness, darkness, and blur. For example if you want to catch movement of a athlete or waterfall just as it is in real life with no blur you'd want to use a fast shutter speed like 1/500th of a second and up. If you want the creamy smooth blur effect on a waterfall or a light trail at night you'd want to use a slower shutter speed like 1,5, or 10 seconds. A tripod is a MUST for slower shutter speeds. This is my go to Tripod. 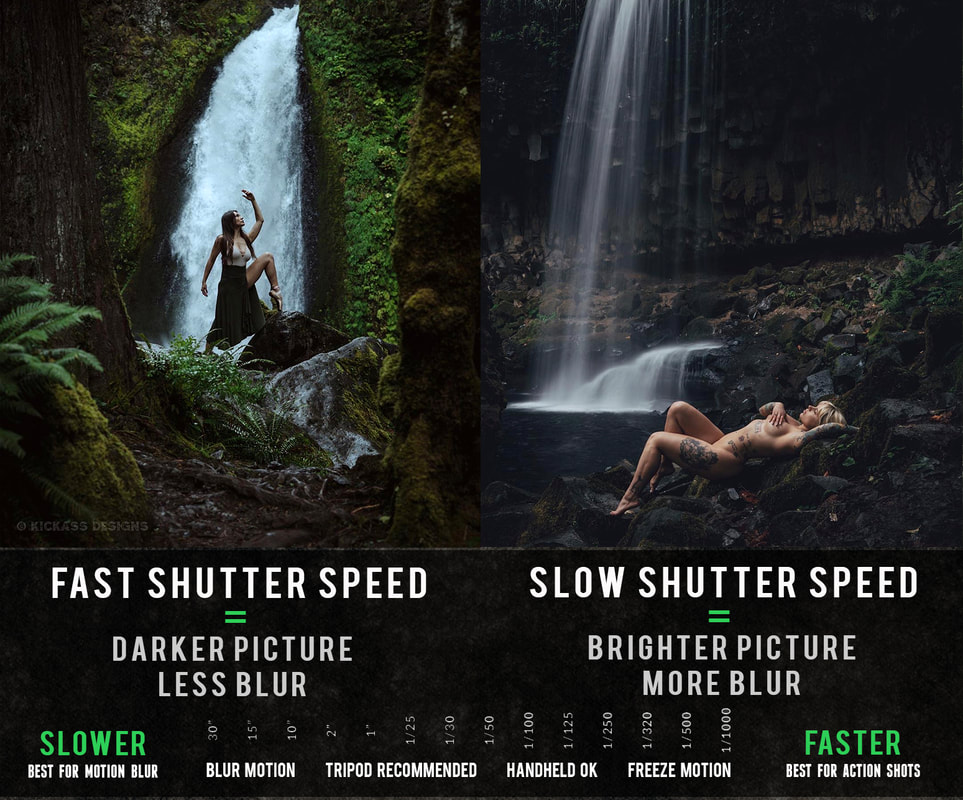 Now that you know how each of these elements effects your exposure it's important to remember each one plays off the other. If you change one you'll have to change the rest. Lets say you're photographing a sporting event. High action, lots of movement. You'll need to crank up your shutter speed so your subjects aren't blurry. Probably 1/1000 and up. However, by doing so that will make your images darker so to makeup for the shutter speed you'll have to bring up the ISO. Lets say you're photographing a beautiful landscape or group of people, you'll want a large F-stop so everything and everyone is in focus. That will however bring down the brightness so you'll have to bring up the ISO and slow down your shutter speed to something like 1/125 to makeup for it. It's a dance but the more you do it the easier it will get. Of course there are pre-set modes on every camera to make this easier but then you have less control. Practice is the only way you will truly master your camera so get out there and practice, practice, practice. Shoot in RAW The 4th Element I think every new photographer should know is the power of shooting in RAW instead of JPEG. RAW files are a format that captures all the image data from your camera. ... Because no information is compressed with RAW you're able to produce higher quality images, as well as correct problem images that would be unrecoverable if shot in the JPEG format. Of course you'll need a program like adobe Light room or Photoshop to edit the RAW file but you have so much more to work with. Shooting in RAW will elevate your photography tenfold. I hope these tips help. Let me know if they did in the comments below and make sure to connect with me on Instagram HERE
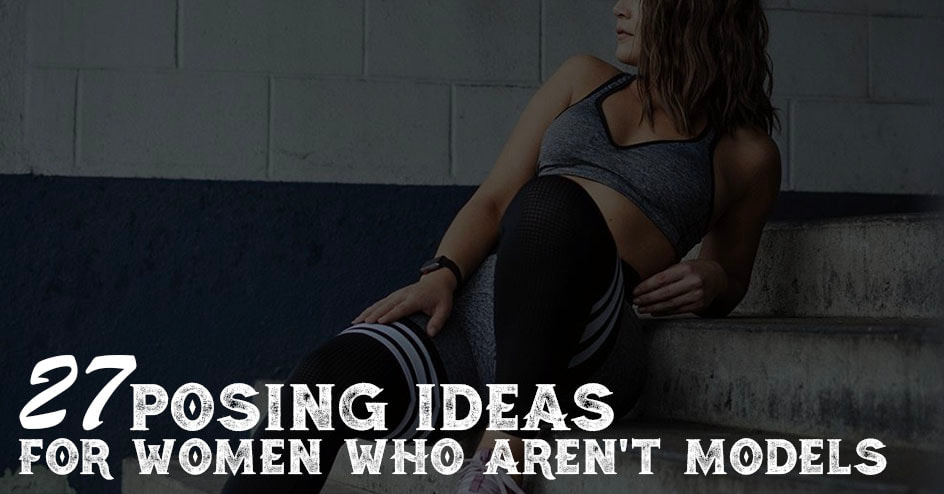
 Lets face it, professional models can take a lot of the burden off us as photographers by bringing their posing expertise to the table. But unfortunately we don't always have the benefit of shooting with a professional model. As a high caliber photographer it is important to have the ability to pose normal people with little to no experience in front of the camera. If posing for modeling is a challenge for you this list of 27 posing ideas along with photos for reference should help. Every photo below was taken by me. Posing Ideas for Men in 2022 While certain genres of photography get to work with models, most genres involve shooting normal people who will have varying degrees of comfort in front of the camera and natural posing ability. Posing was the hardest thing to learn for me personally and it is something I still work on every day. While I am jealous of photographers who have a natural ability to pose people on the fly, I unfortunately have found that I work best by having a list of go-to poses that I know work well for me and can fall back on if I need to. Until now I have kept that list to myself. If you are a model or photographer who struggles with posing I hope this list helps but just remember, posing is only half the battle. Models: The best posing in the world wont matter if your appearance is off. So, show up with 3 or 4 of your best outfits, get your hair cut and your beard trimmed if you have one. Looking your best will boost your confidence on the day of the photoshoot and it will show on camera. Pro Tip. Keep some Beard Balm or Styling Gel-Pomade on hand to keep those fly away hairs in check. | You May Also Like: 27 Posing Ideas for Women Make sure to bookmark this page so you can bring it up at any shoot and go down the list and nail every pose. You do that and you will be guaranteed to leave the shoot with tons of variety. Connect with me on Instagram HERE and let me know if this article helped in the comments below. 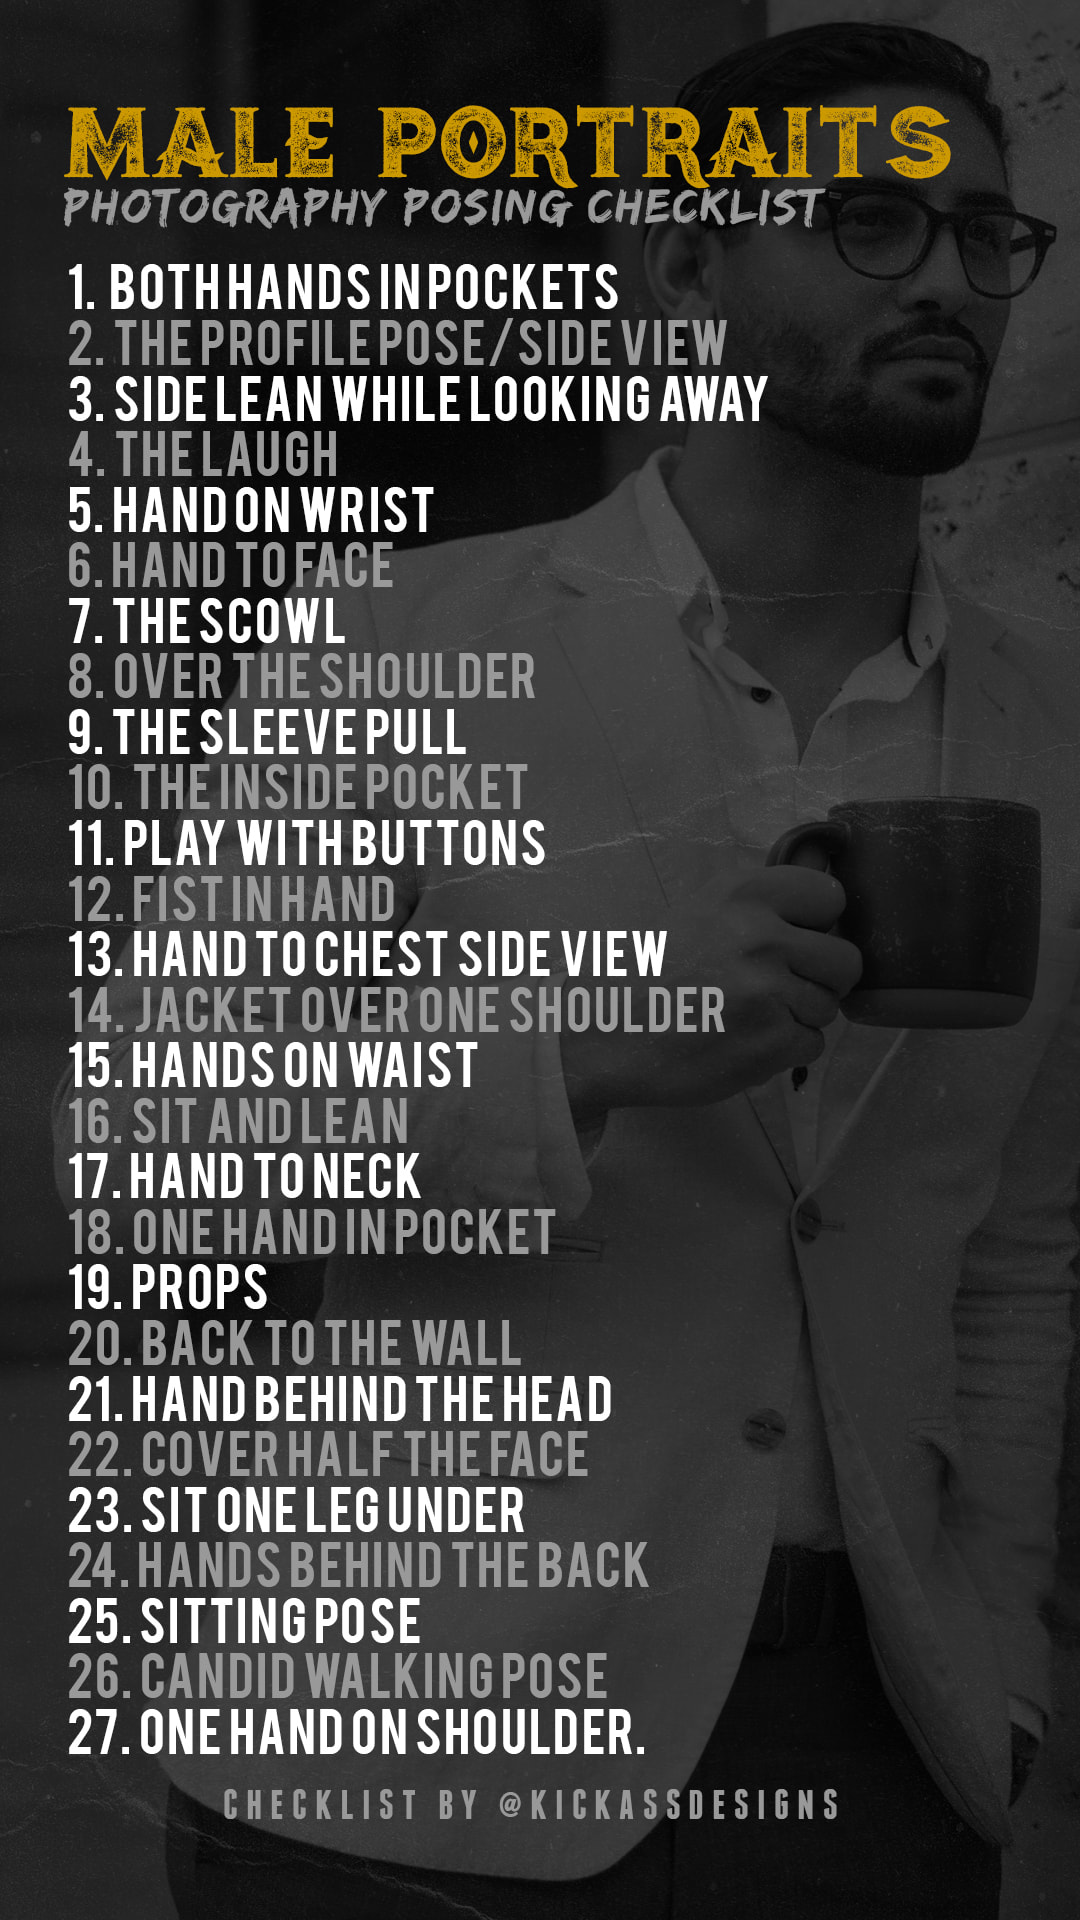 1. Both hands in pockets This pose works just as well with both hands in your subjects pants pockets but if they are wearing a jacket have them place both hands in their jacket pockets. Try full hands in or just thumbs showing. 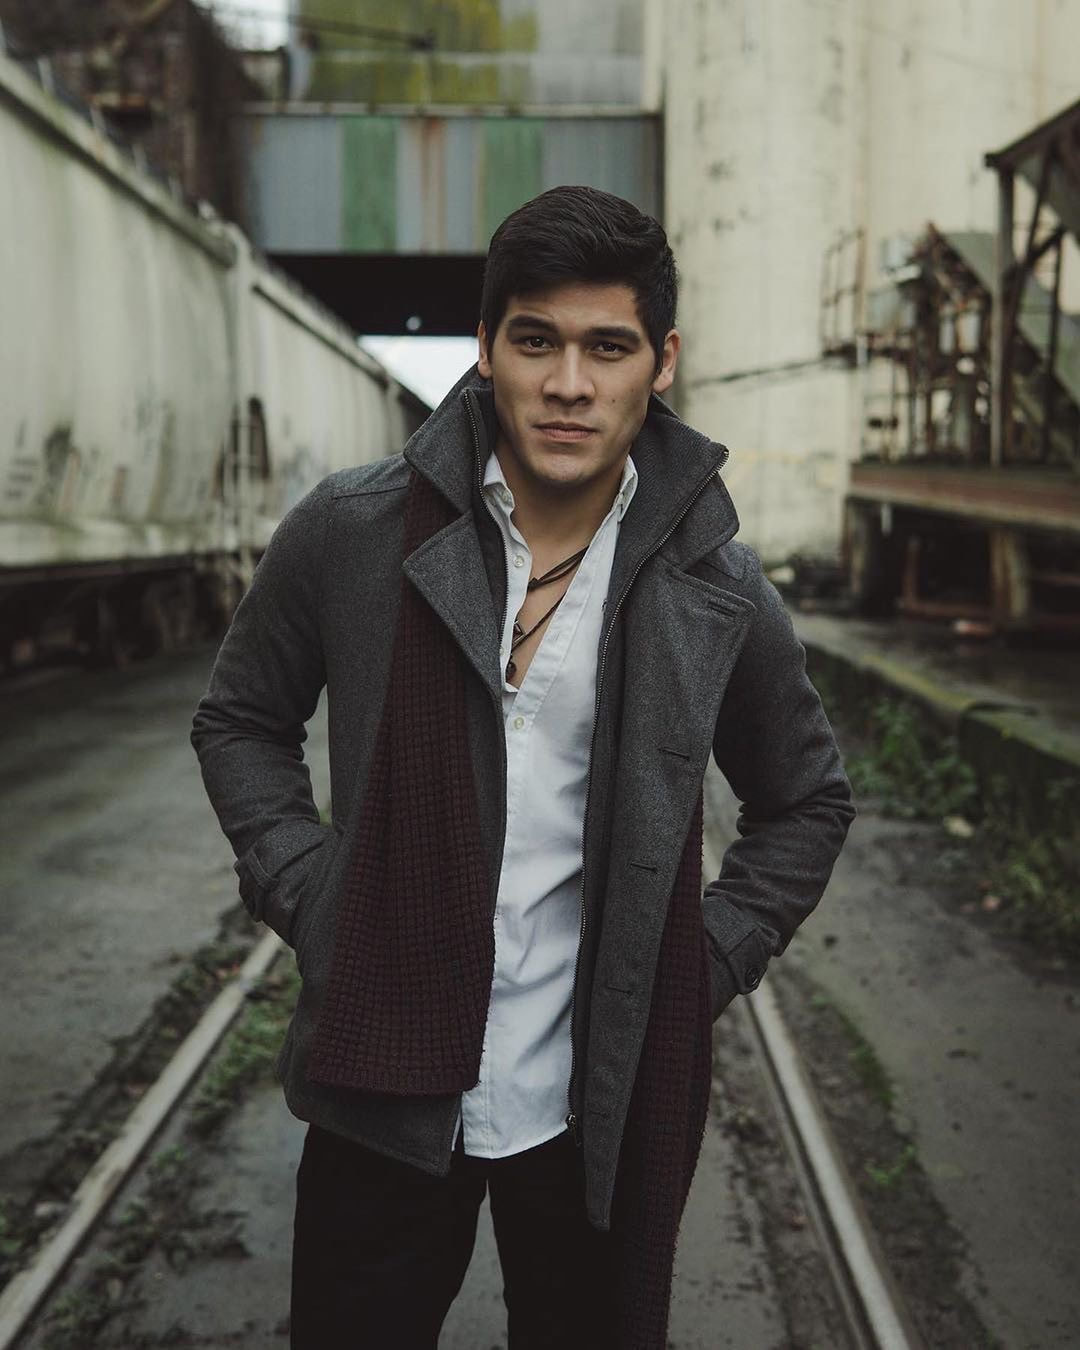 Model: @kaleo_rav3 on IG 2. The profile Pose/Side View Have your subject stand to the side so you can only see one side of their face. Ask your subject if they have a favorite side. Most people do. Make sure to try different angles and perspectives. | You May Also Like: Best Modeling Agencies in Portland 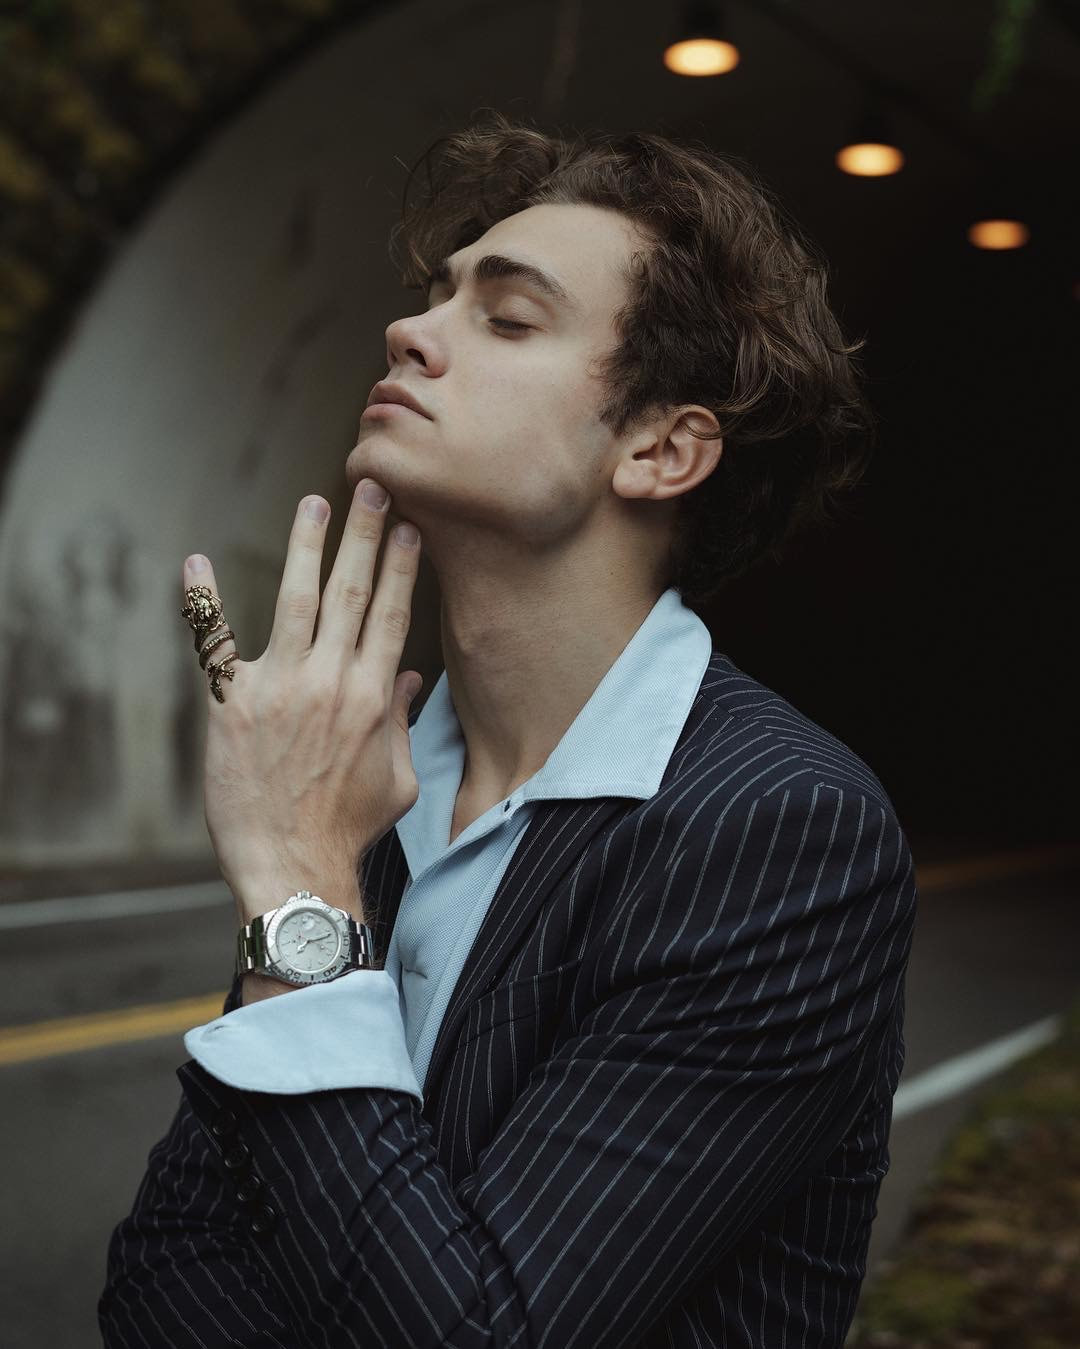 Model: @a_russian_guy on IG 3. Side Lean While Looking Away Have your subject lean against a wall with one shoulder against the wall. Have them look at the camera, up at the sky, turn their head and look down or off into the distance. Make sure they have good posture. Stand tall and straight. Add a prop like coffee for more of a lifestyle feel. 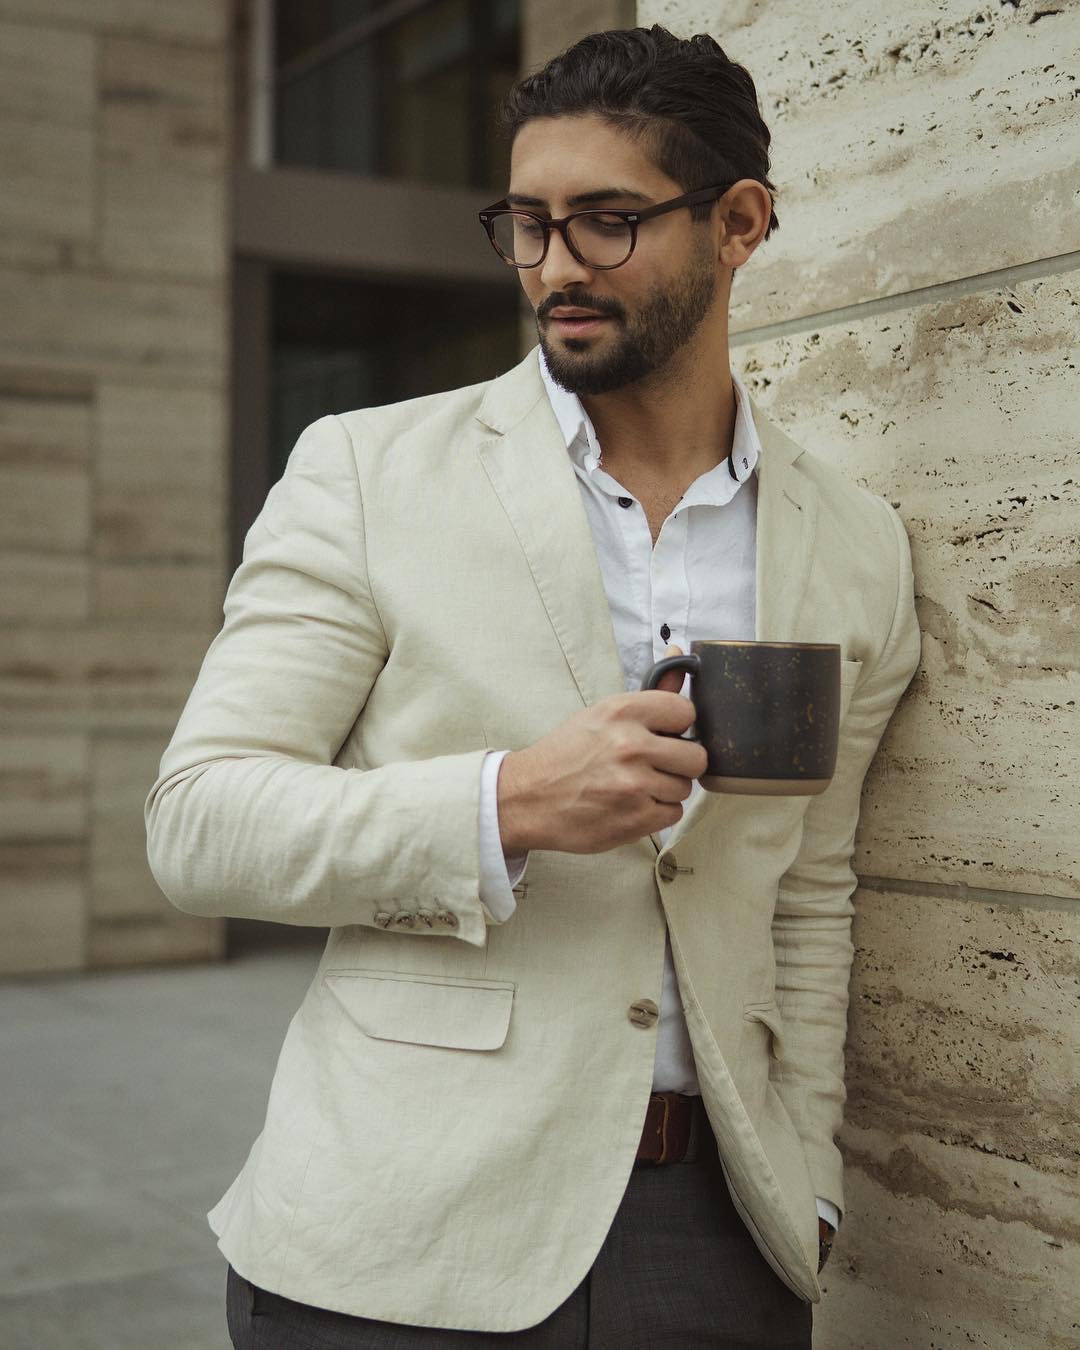 Model: @kamyar_jahan on IG 4. The Laugh Any time you can get your subject to genuinely smile or laugh take the shot. These candid moments are gold. Something I like to do for a laugh is ask my subject their favorite comedian and play that comedian on Spotify for a few minutes until they laugh. Or dad jokes, Really bad dad jokes often do the trick. | You May Also Like: Improve your photography with natural light 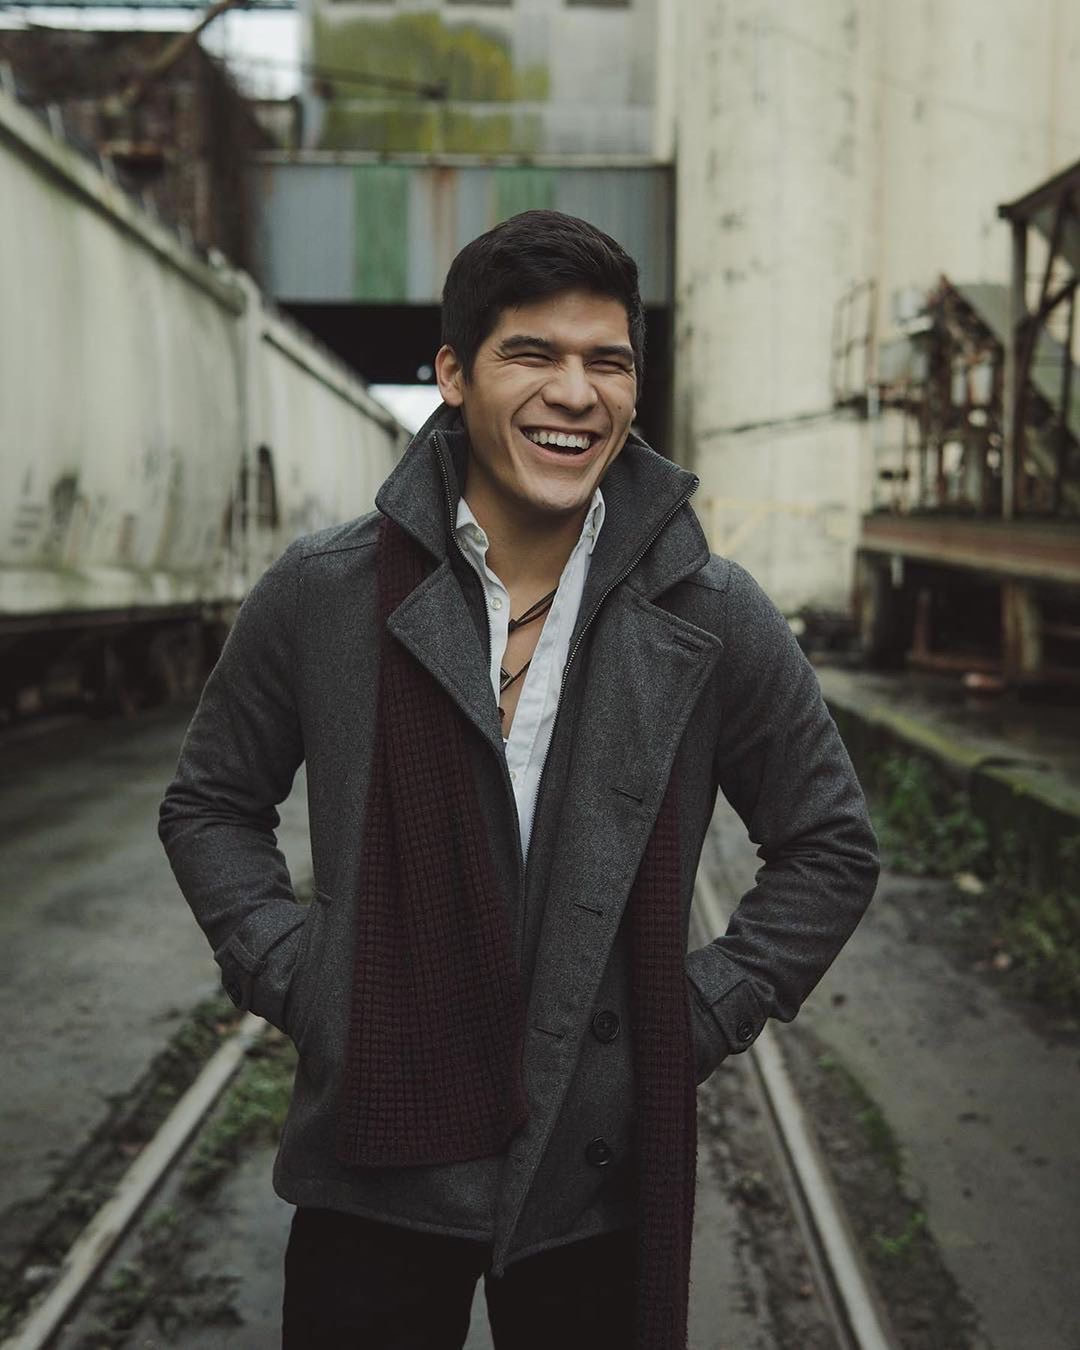 Model: @kaleo_rav3 on IG 5. Hand on Wrist This one only works if your subject is wearing a watch or bracelet. I usually tell my male subjects to wear a watch before hand. This gives them just one more thing to do with their hands. They will appreciate it. 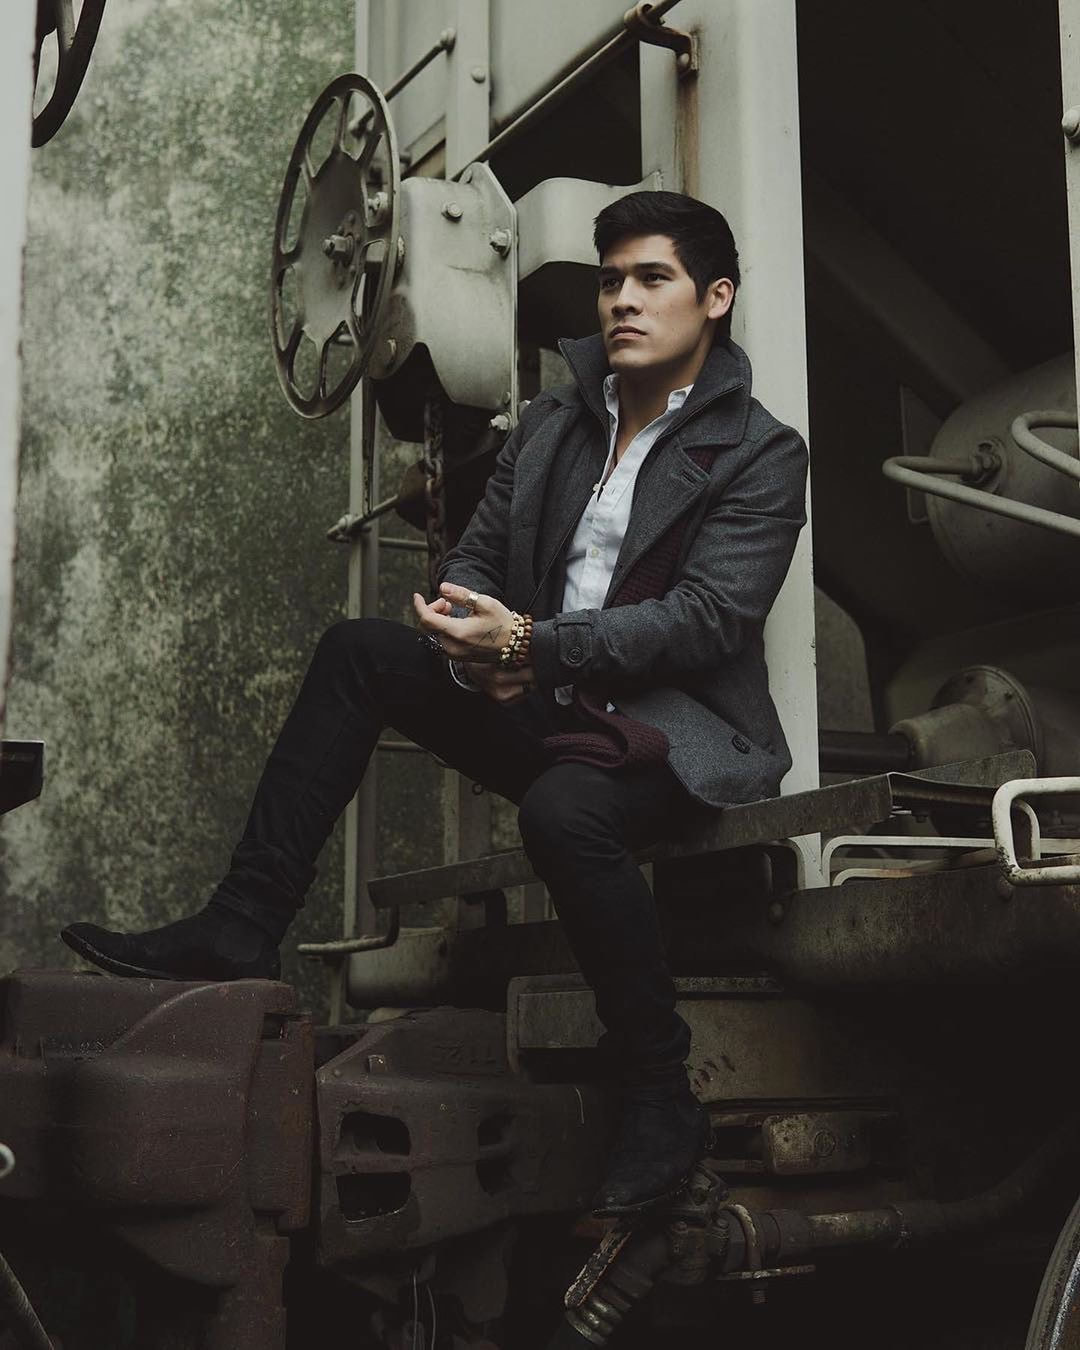 Model: @kaleo_rav3 on IG 6. Hand to Face Have your subject turn to the side, slightly turn their torso/head and rest their head into their hand. Loose fingers and not to much bend in the neck.  Model: @lifeofdylancruz on IG 7. The Scowl If your subject hasn't done a photo shoot before they most likely assume they should be smiling for every photo. But depending on how they plan on using the photos and what mood and message they are trying to achieve smiling may not be the right choice. Try a slight scowl to change things up.  8. Over the Shoulder Have your subject stand or sit to the side and look over their shoulder either at the camera or slightly looking back over their shoulder. A more serious look works best for this pose.  Model: @kaleo_rav3 on IG 9. The Sleeve Pull This pose works great if your subject has on a long sleeve shirt or button up. Have them play with their sleeve by pulling it up. 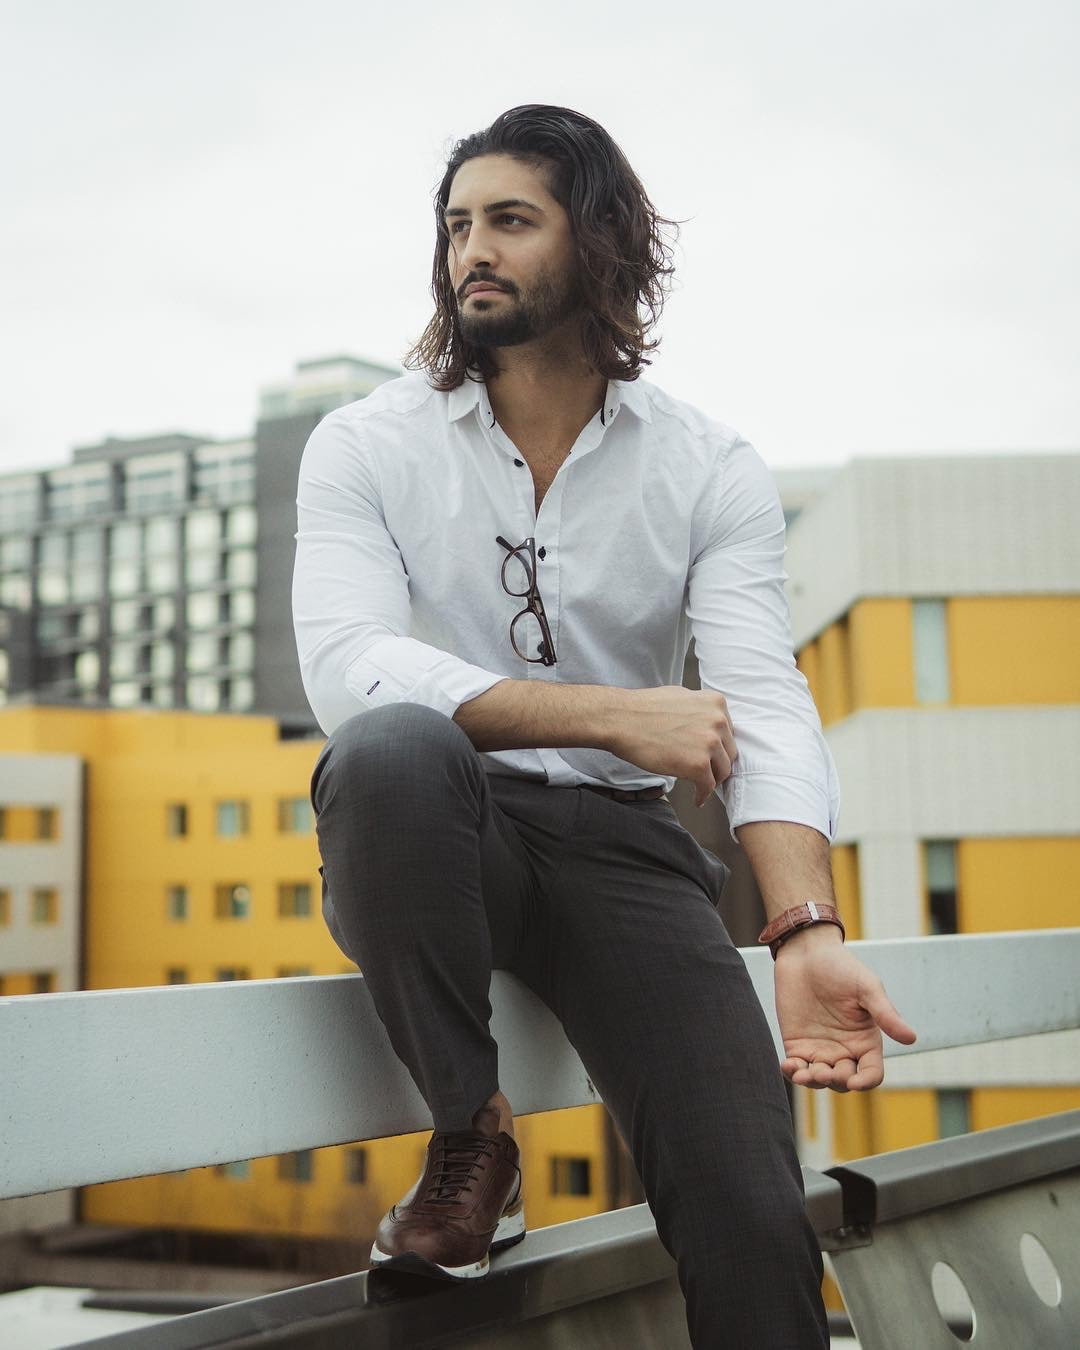 Model: @kamyar_jahan on IG 10. The Inside Pocket If your subject is wearing a blazer or jacket with an inside pocket have them go through the act of putting something in the inside pocket. 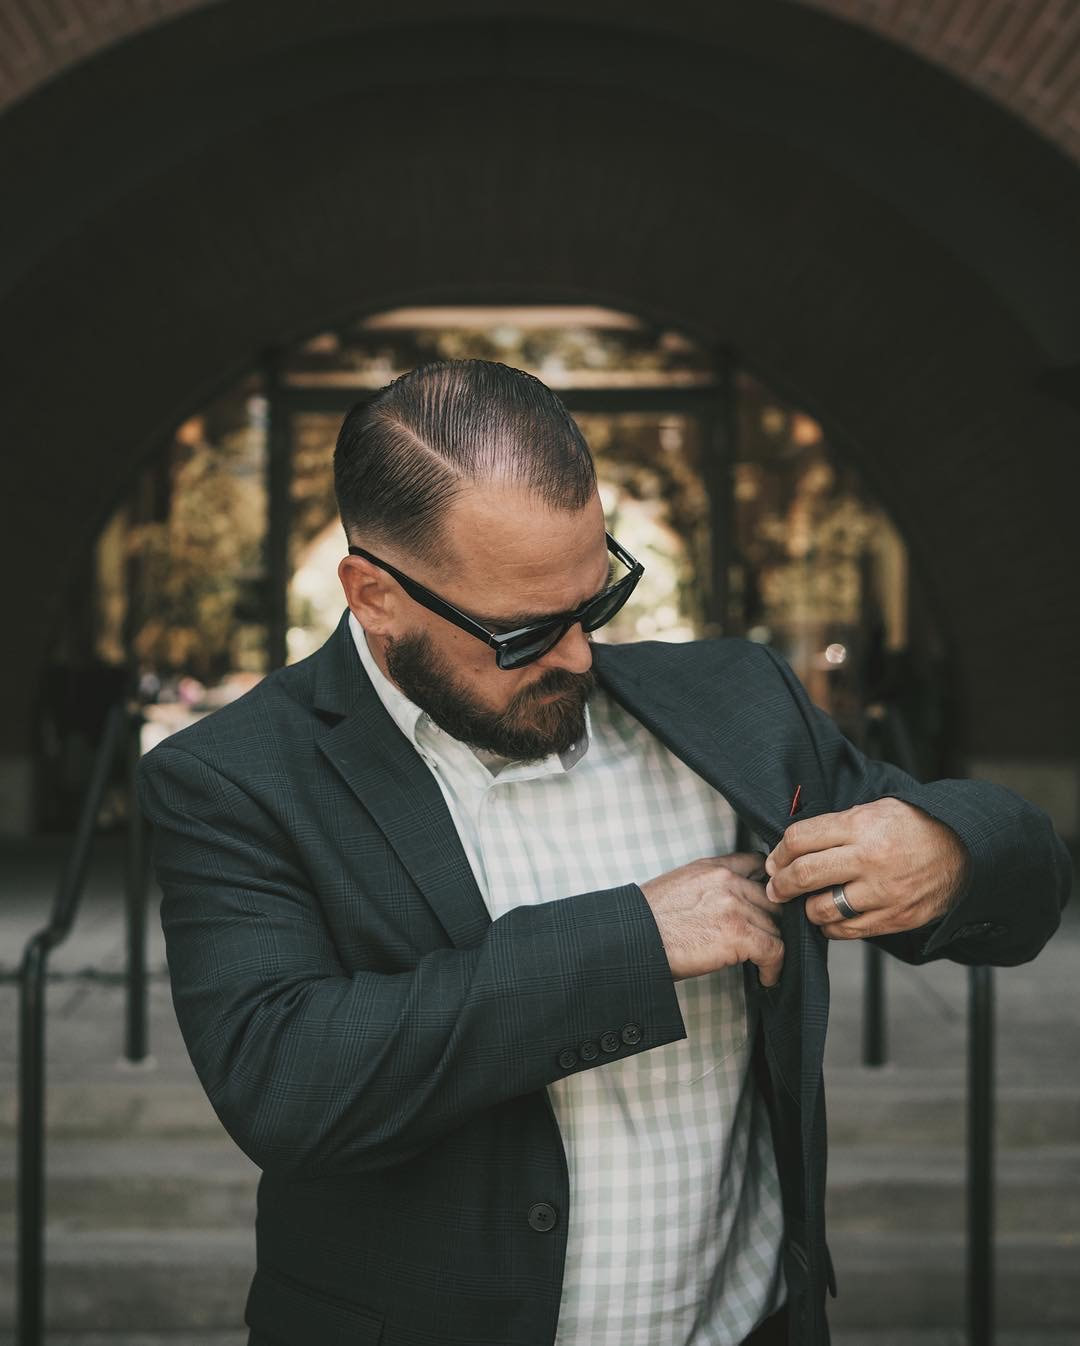 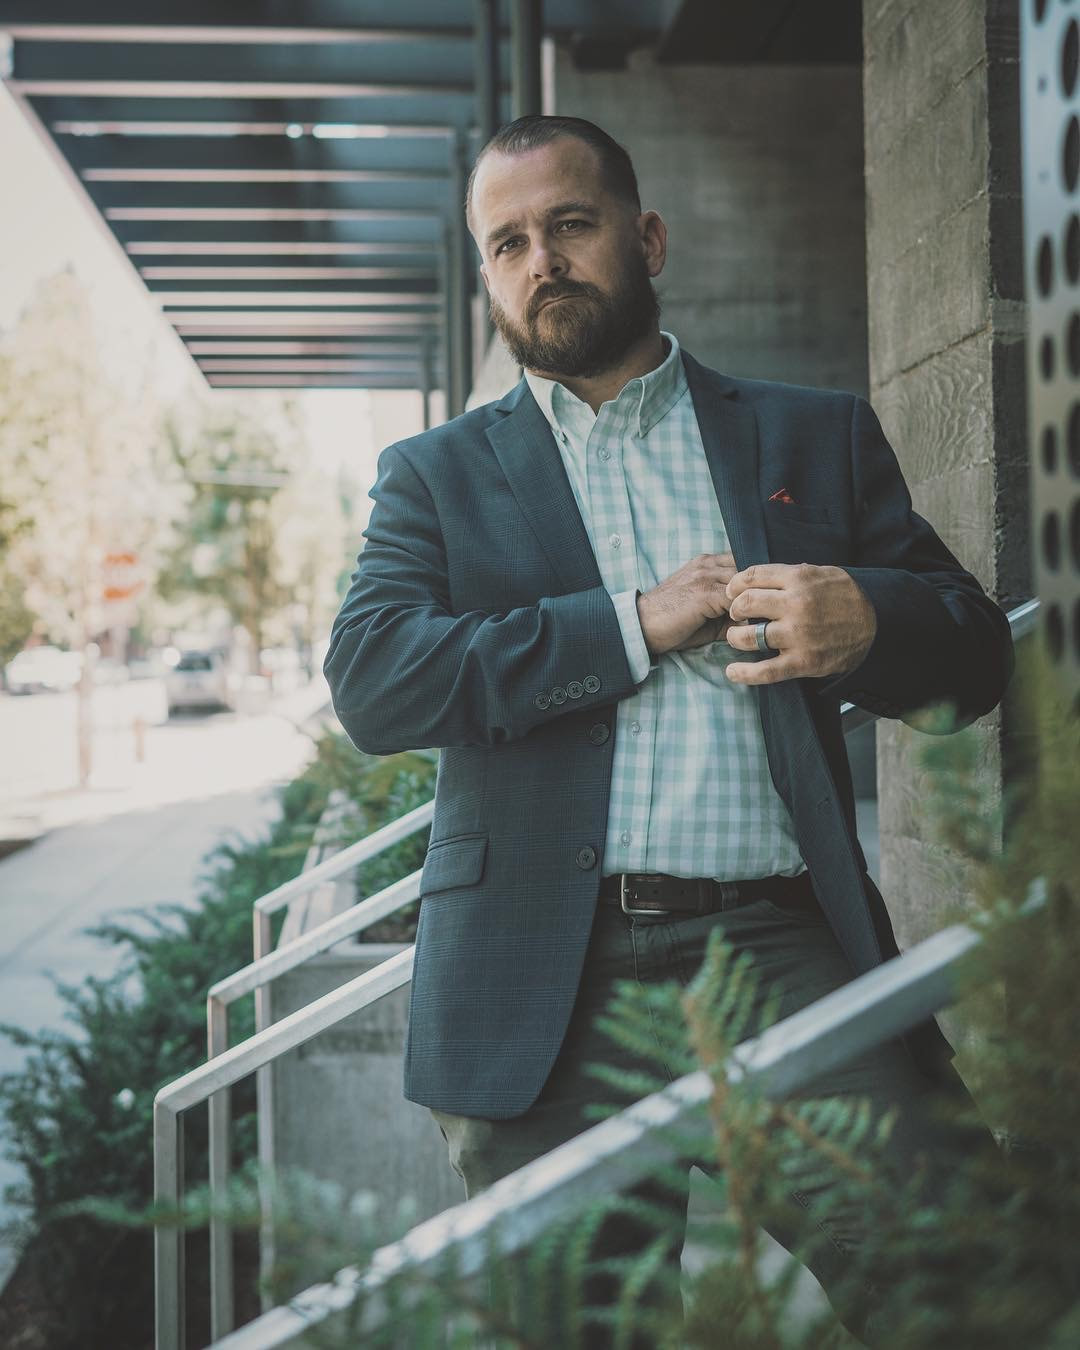 11. Play with Buttons If your subject is wearing a button up have then go through the act of buttoning and unbuttoning their shirt. Have them place one hand over the other as if they are about to unbutton their shirt. 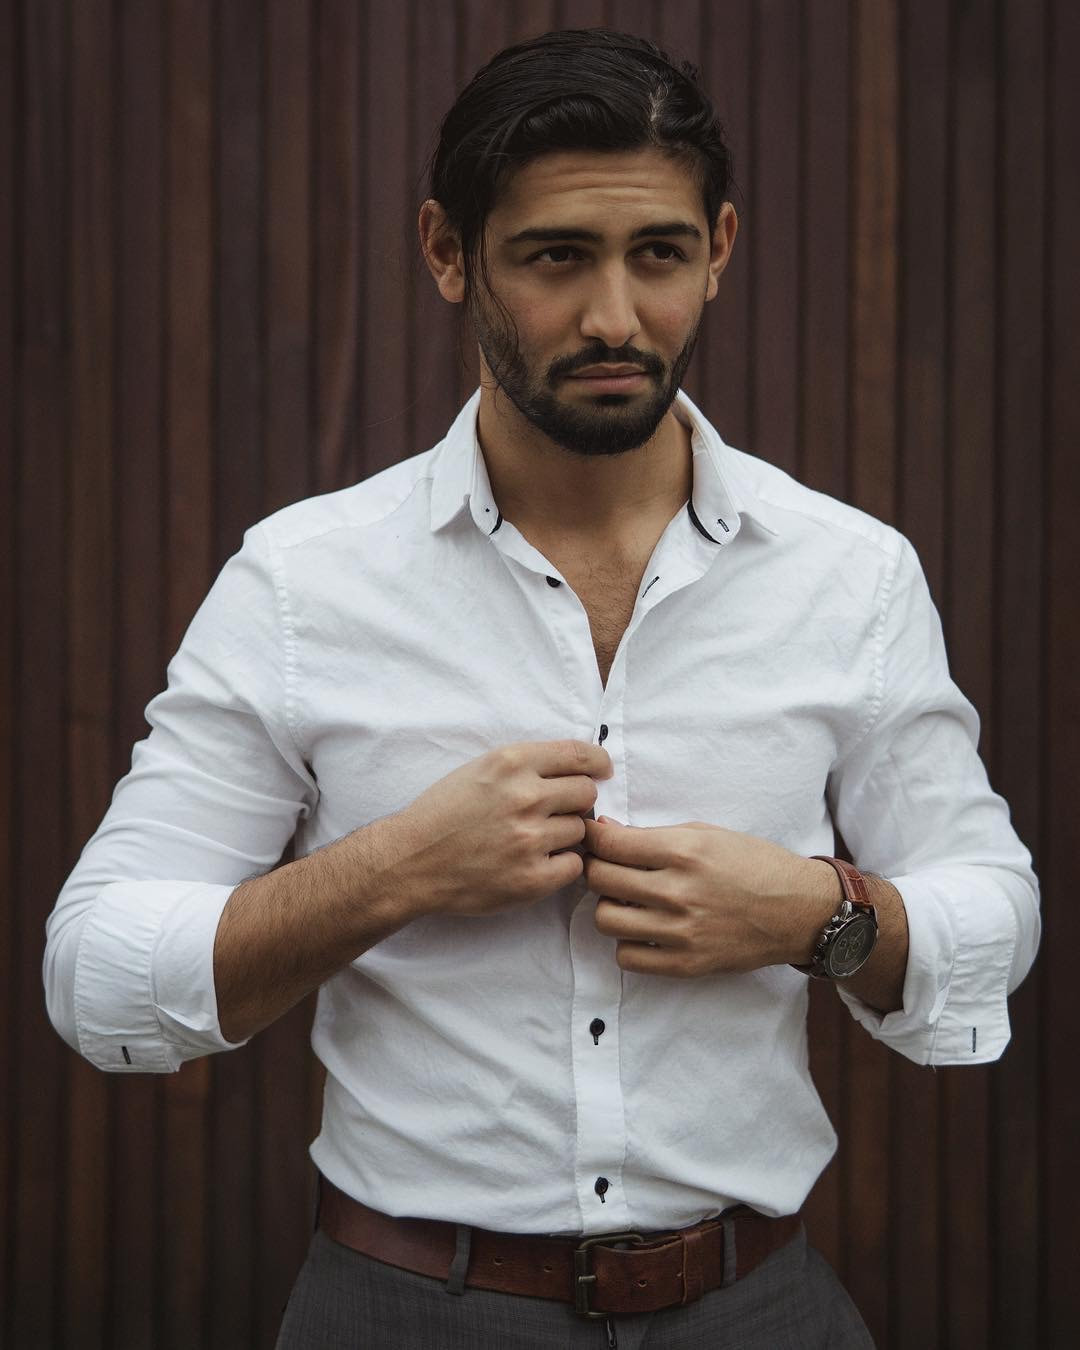 Model: @kamyar_jahan on IG 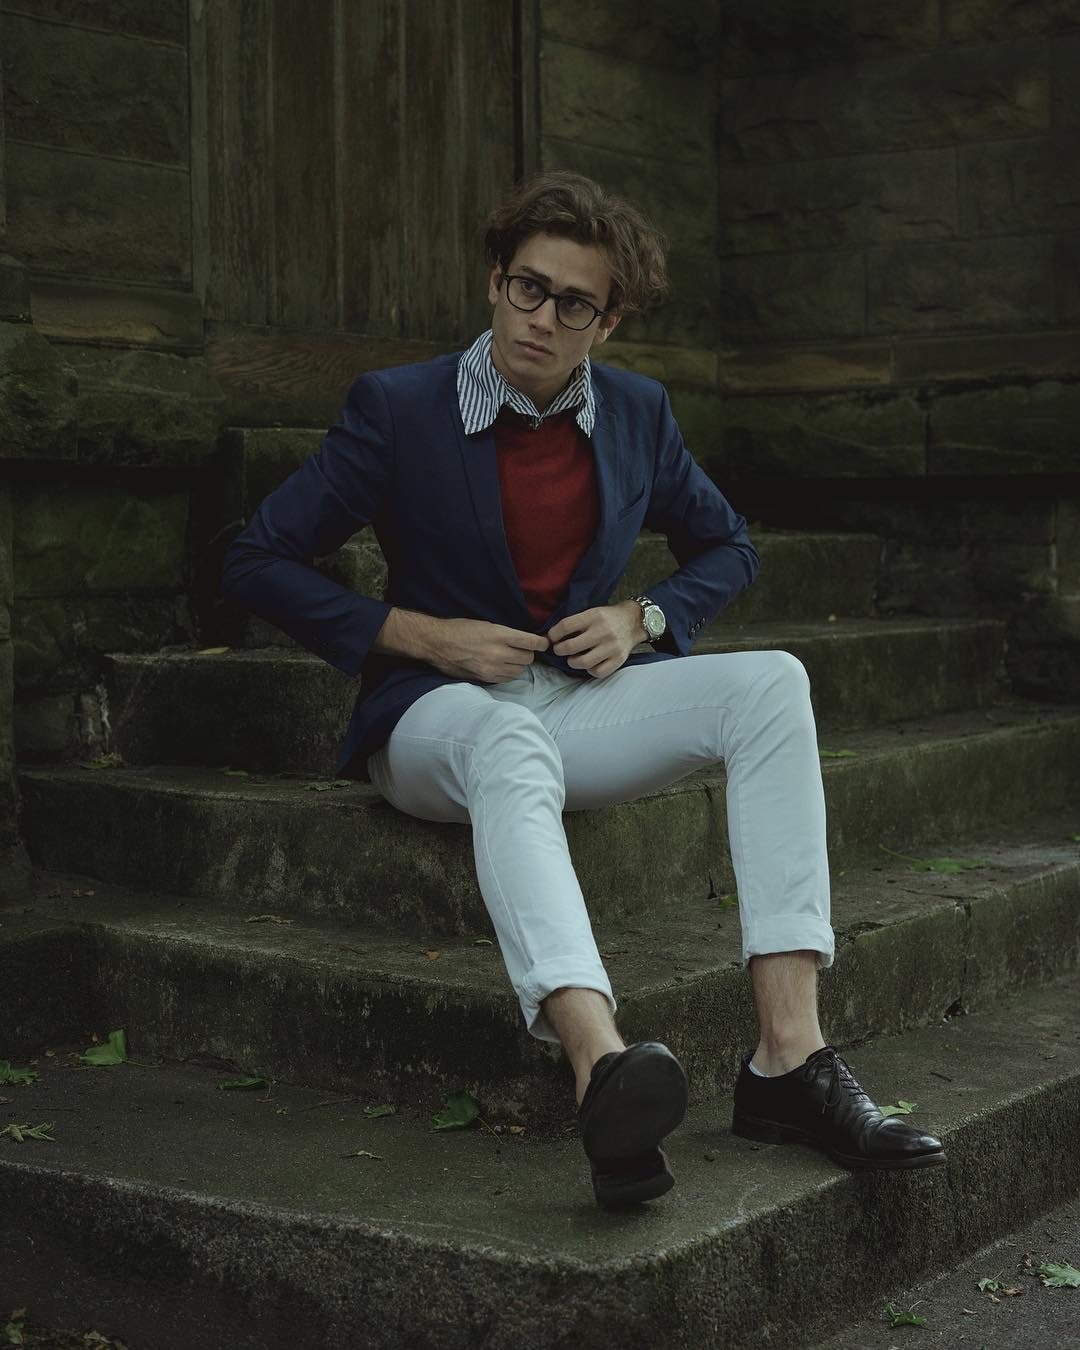 Model: @a_russian_guy on IG 12. Fist in Hand This is a great pose for a more muscular subject who wants to show off those arms. Have them face the camera, stand tall and place a fist in one hand and flex.  Model: @billyd275th on IG 13. Hand to Chest Side View This is another great one for a subject who wants to show those arms. Have your subject stand tall, to the side, slightly turning their torso to the camera with one hand up by their chest, flexing the bicep, and looking into the camera or into the distance.  Model: @starttheworld on IG 14. Jacket Over One Shoulder If your subject has a jacket or blazer have them throw it over one shoulder. 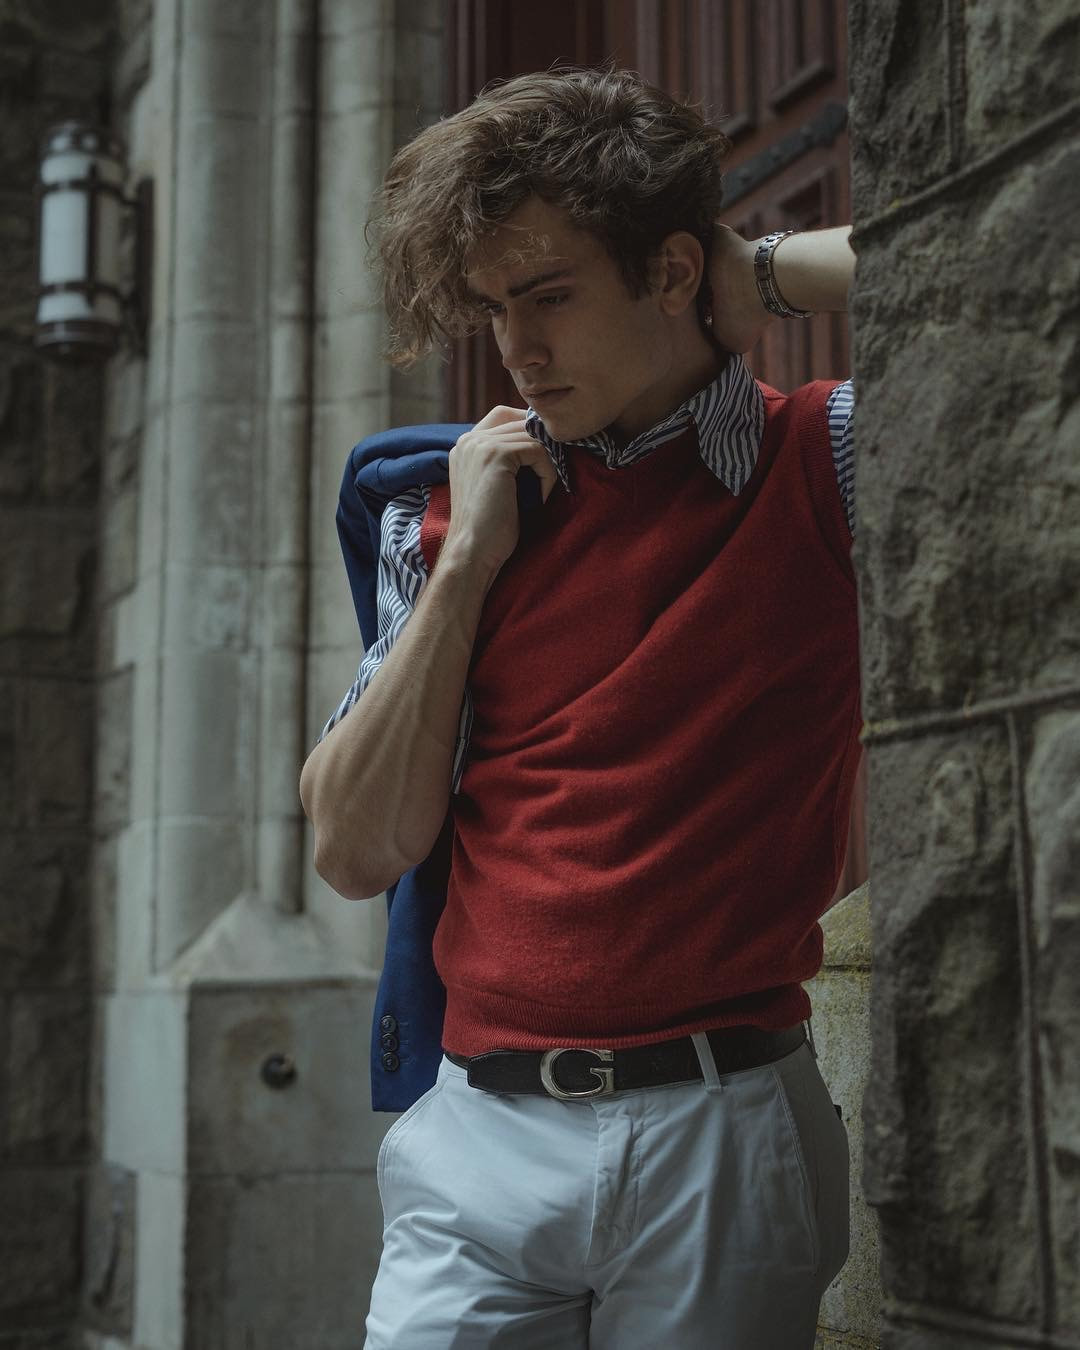 Model: @a_russian_guy on IG 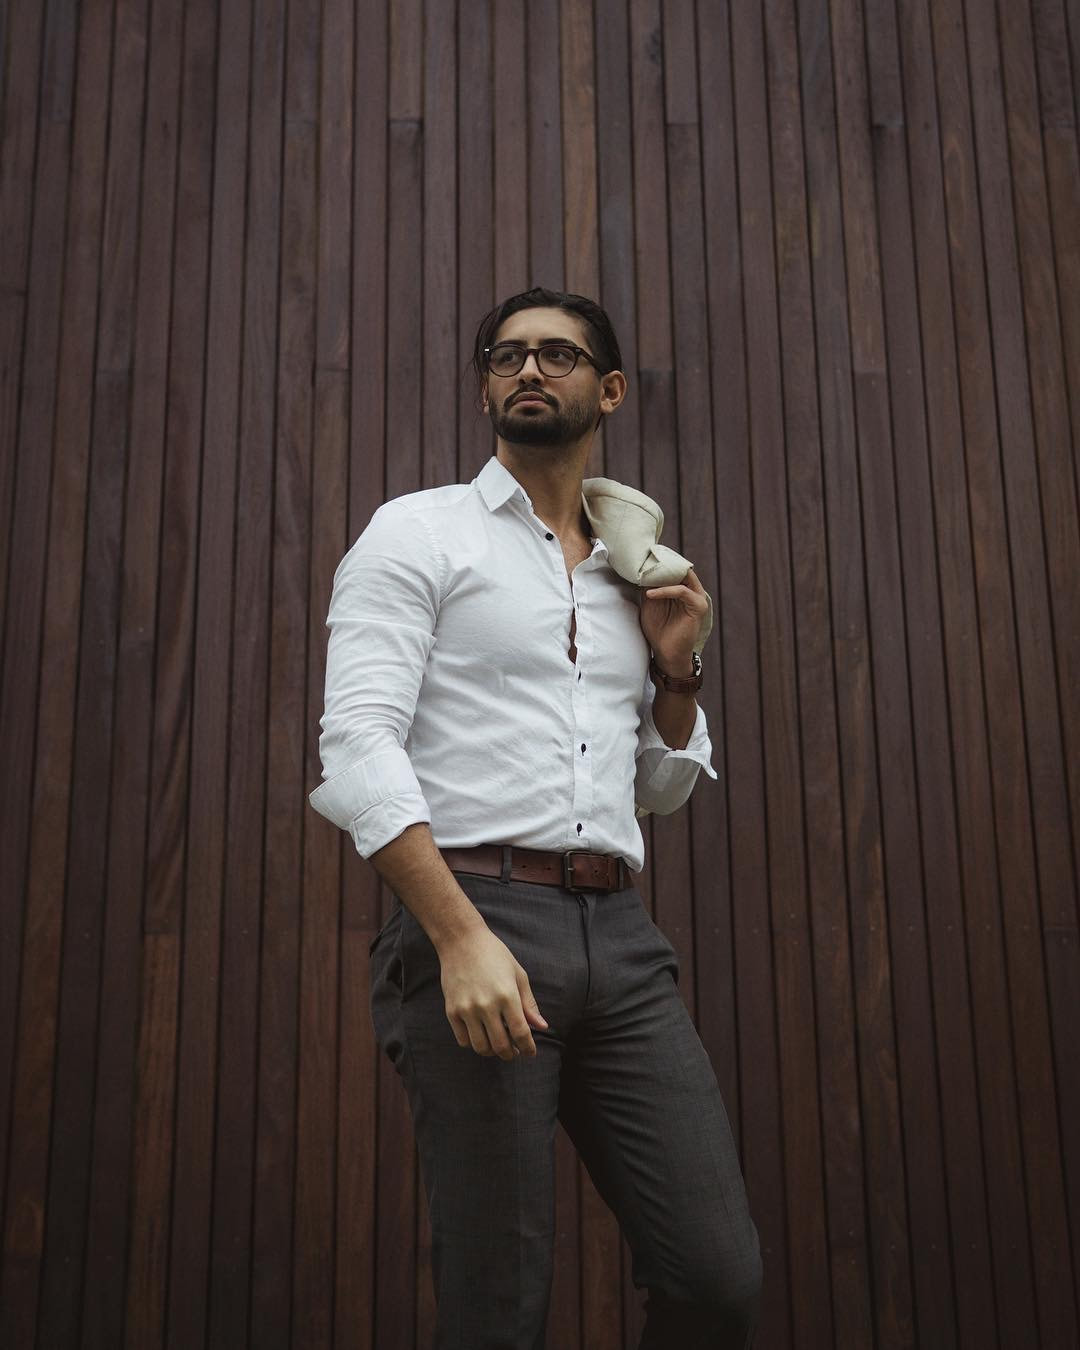 Model: @kamyar_jahan on IG 15. Hands on Waist Have your subject stand tall and place both hands on their hips or waist and flex those arms. Shoot from slightly below at an upward angle for a stronger look.  Model: @billyd275th on IG 16. Sit and Lean Have your subject sit and lean placing an elbow on the knee and hand to face.  Model: @a_russian_guy on IG 17. Hand to Neck Have your subject bring a hand to their neck just below the chin. Keep the hand loose. They aren't choking themselves. 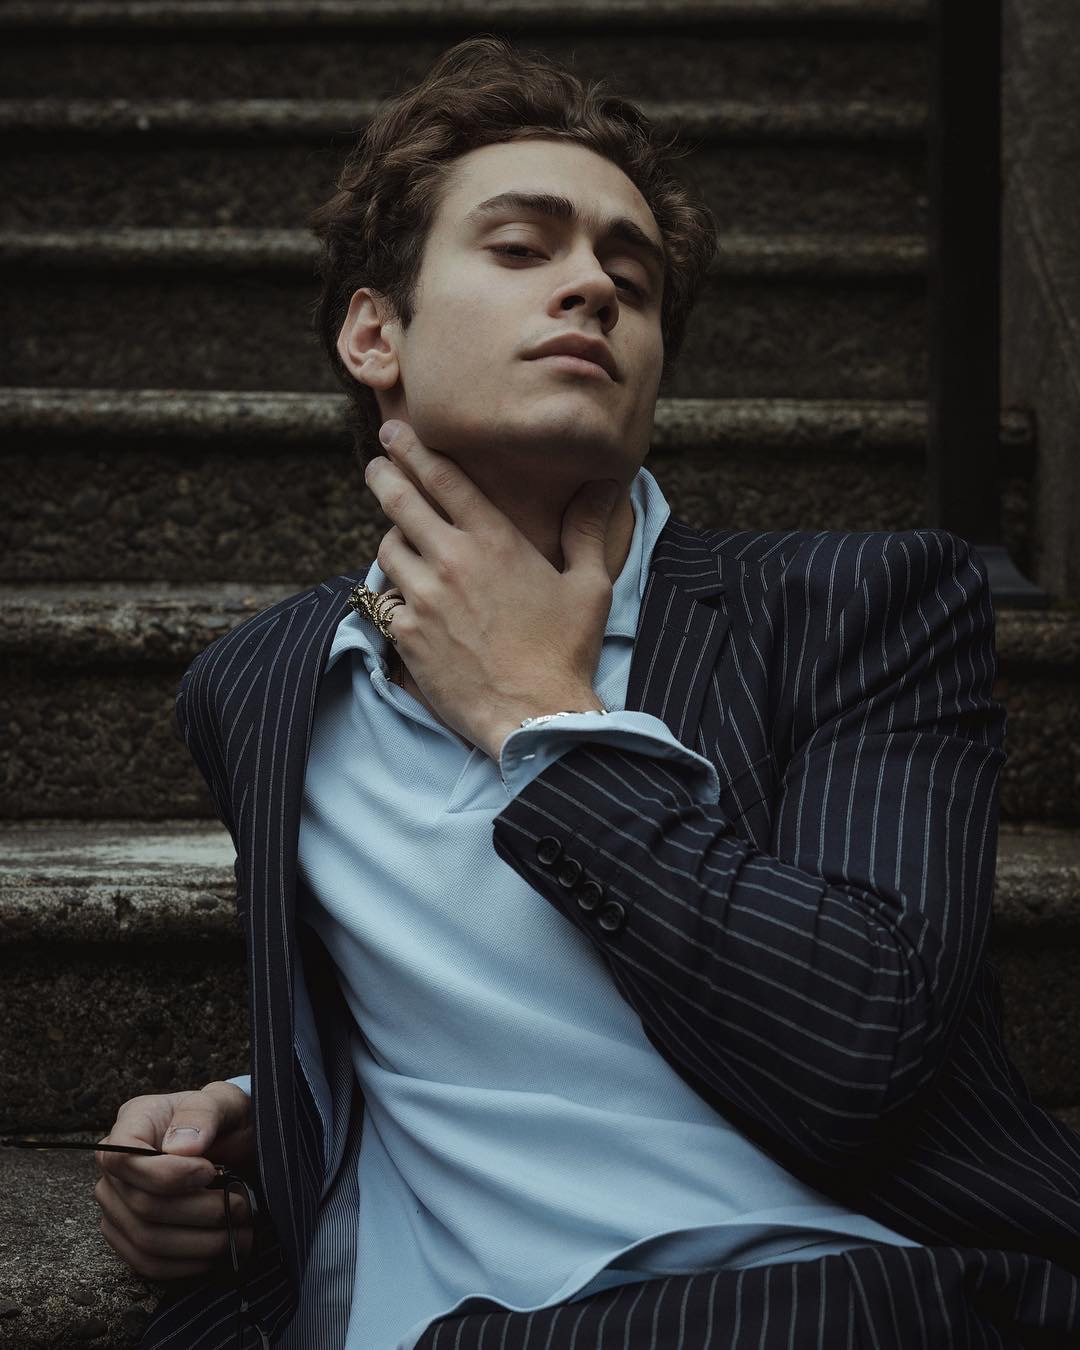 Model: @a_russian_guy on IG 18. One Hand in Pocket Have your subject place just one hand in a pant pocket. 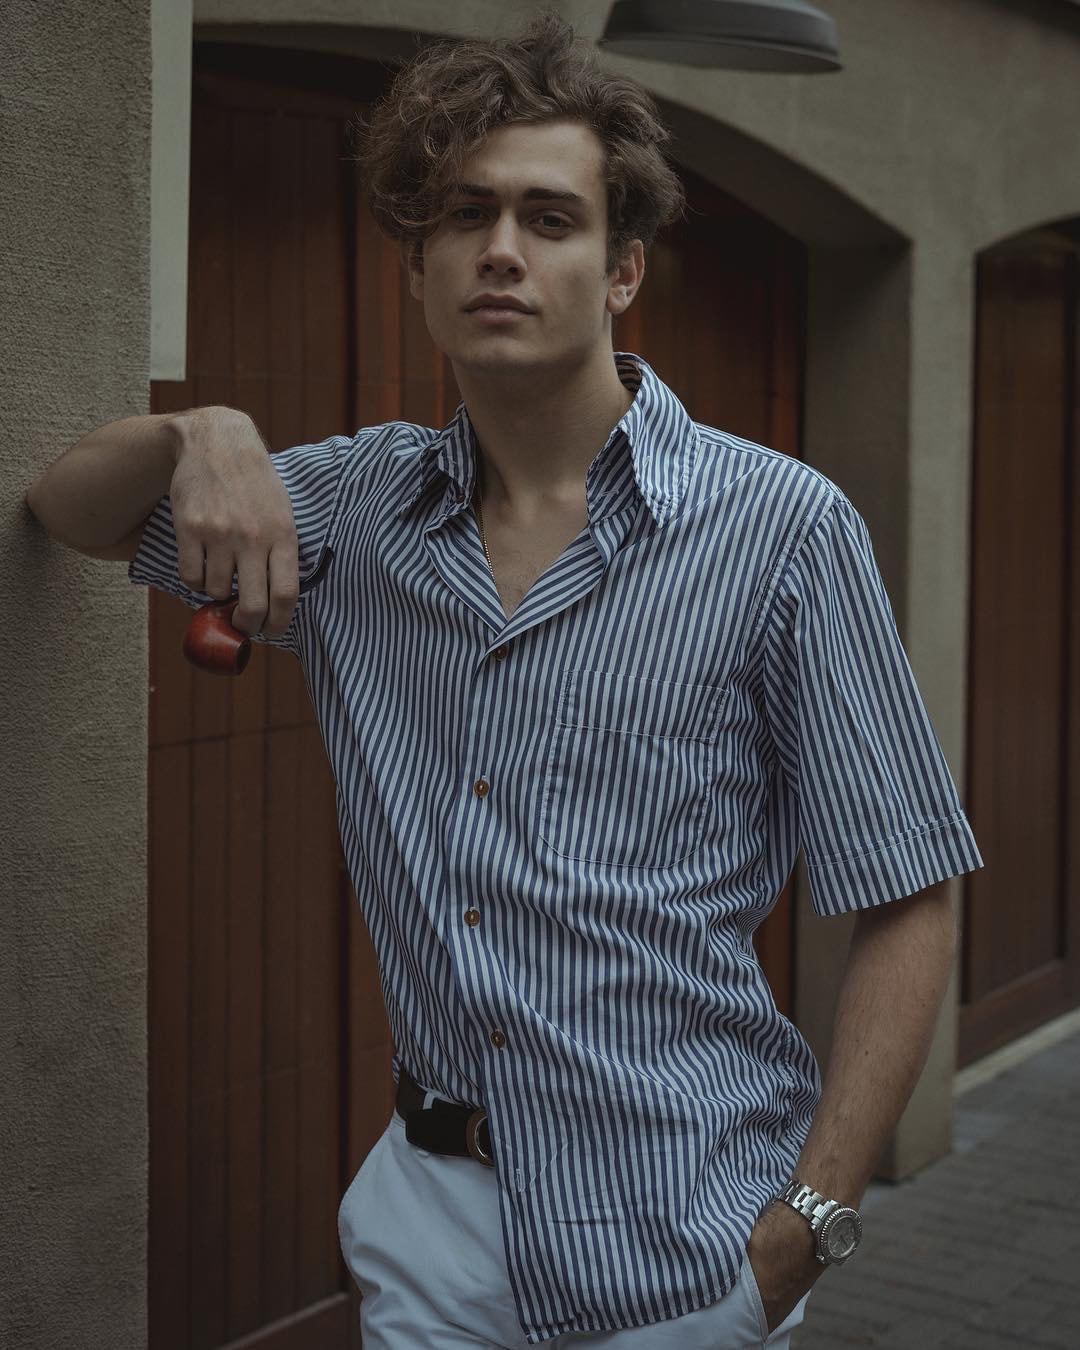 Model: @a_russian_guy on IG  Model: @a_russian_guy on IG 19. Props Depending on the mood and message your subject wants to convey a book is an easy prop to bring with you that can be used in multiple ways shown below. Again your subject will appreciate you giving them something to do with their hands. 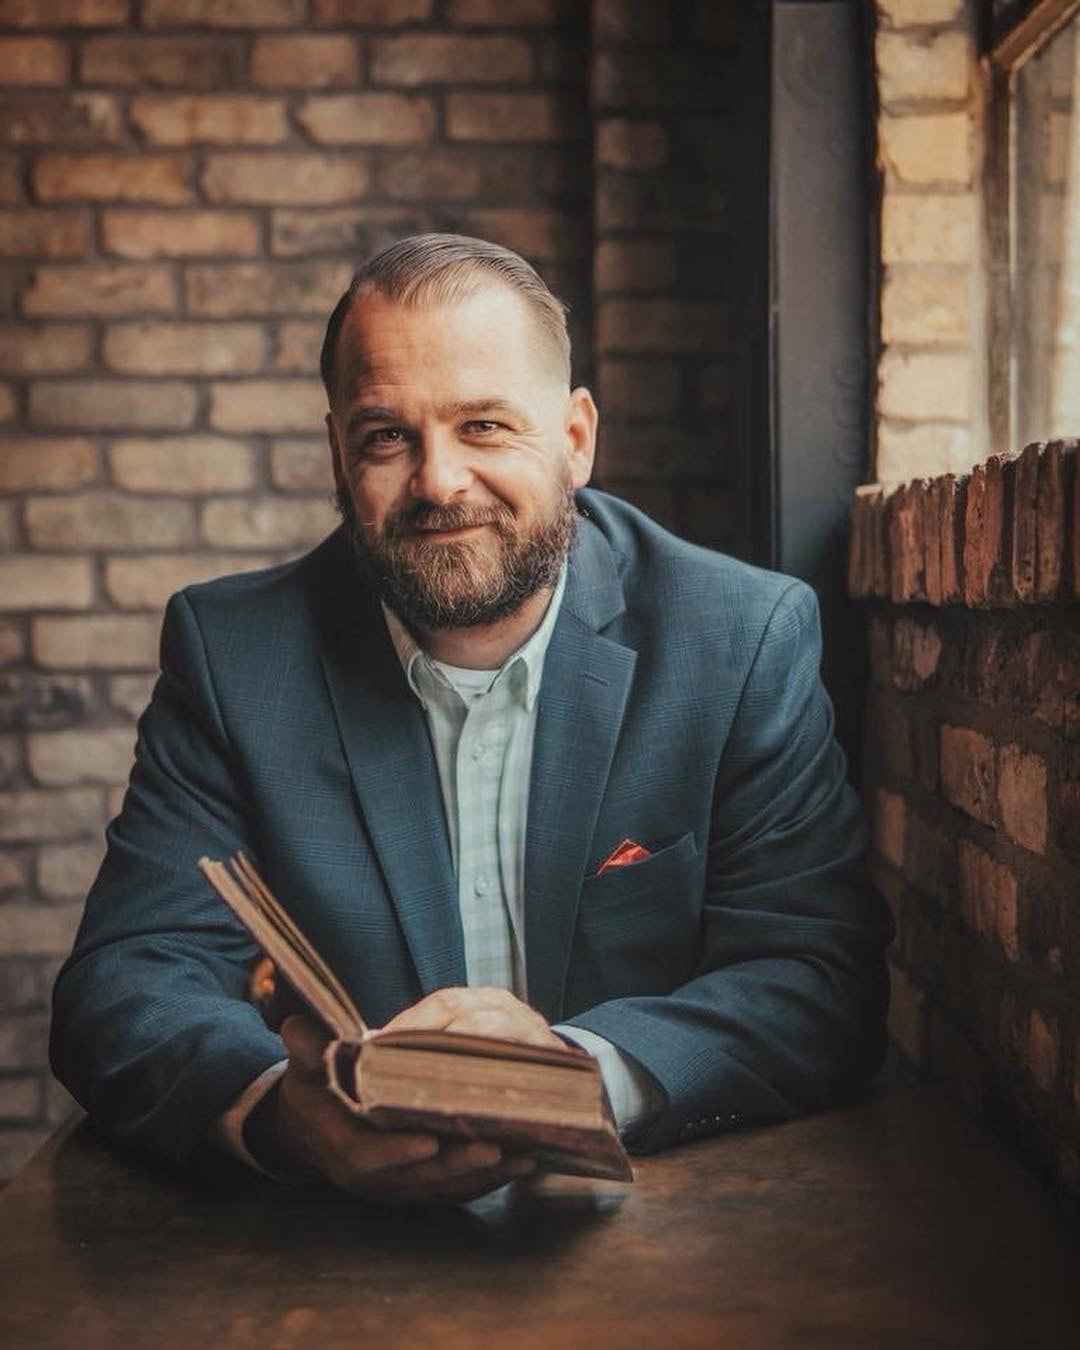 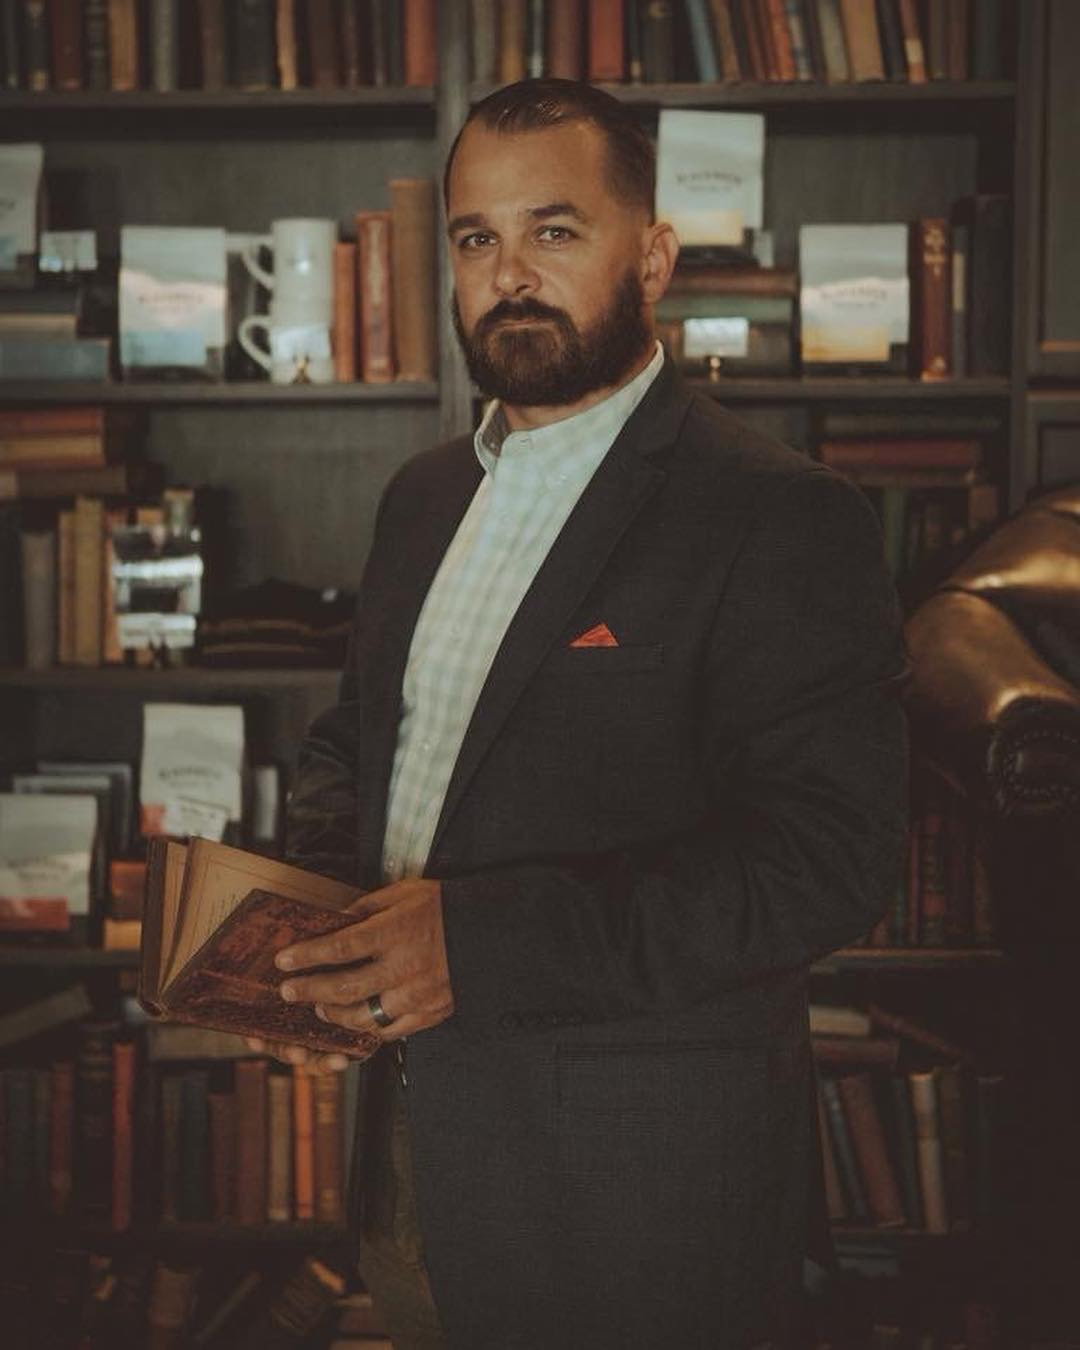 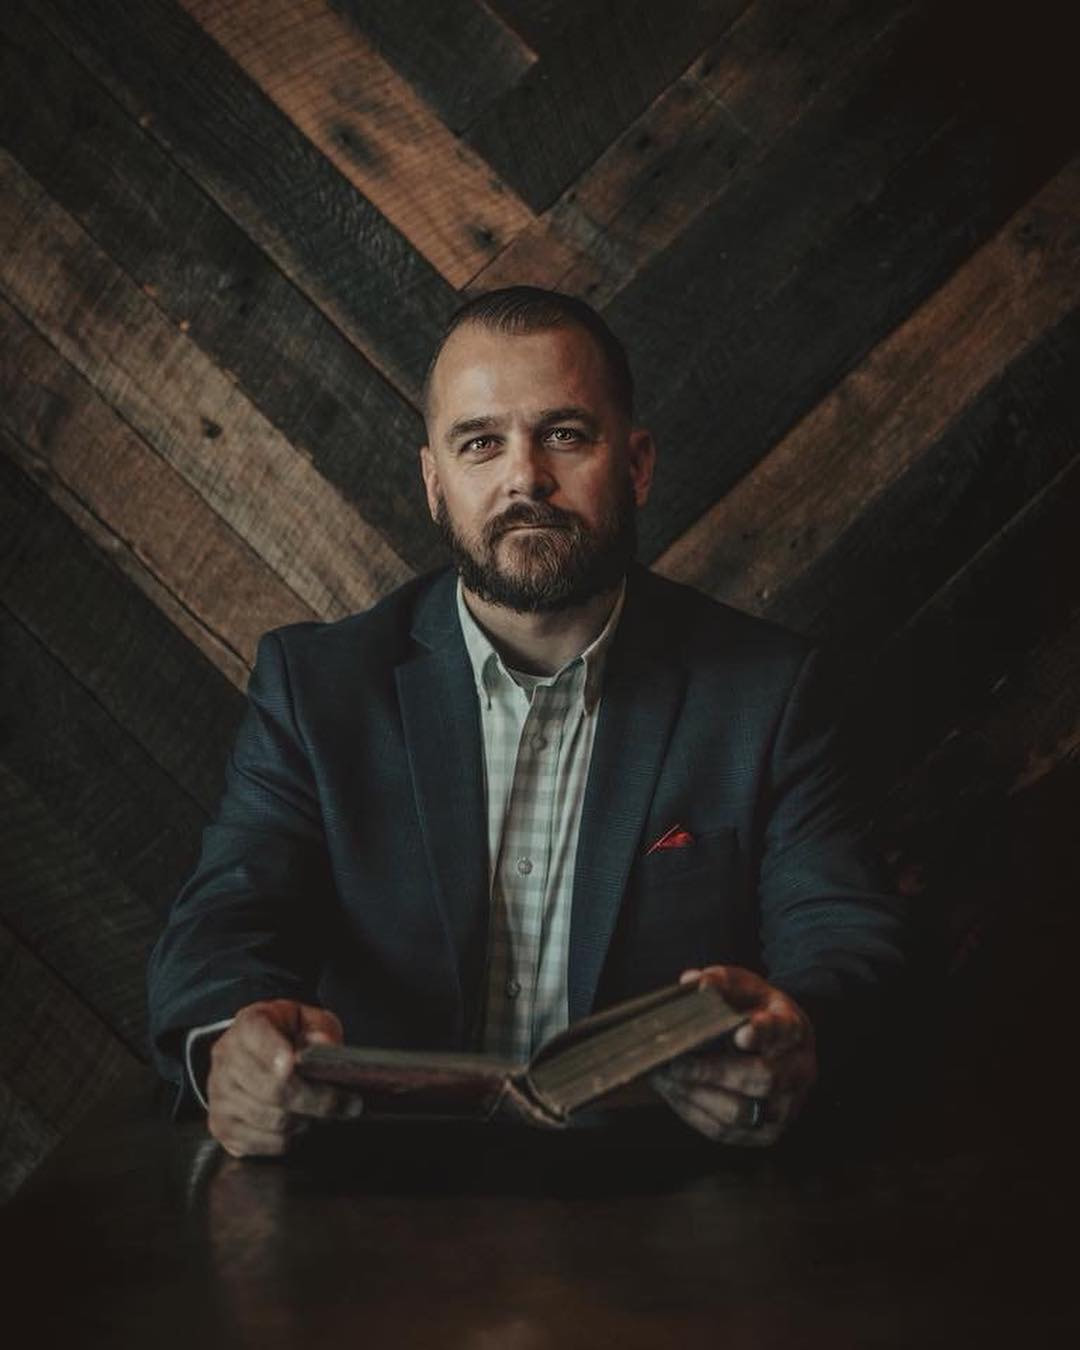 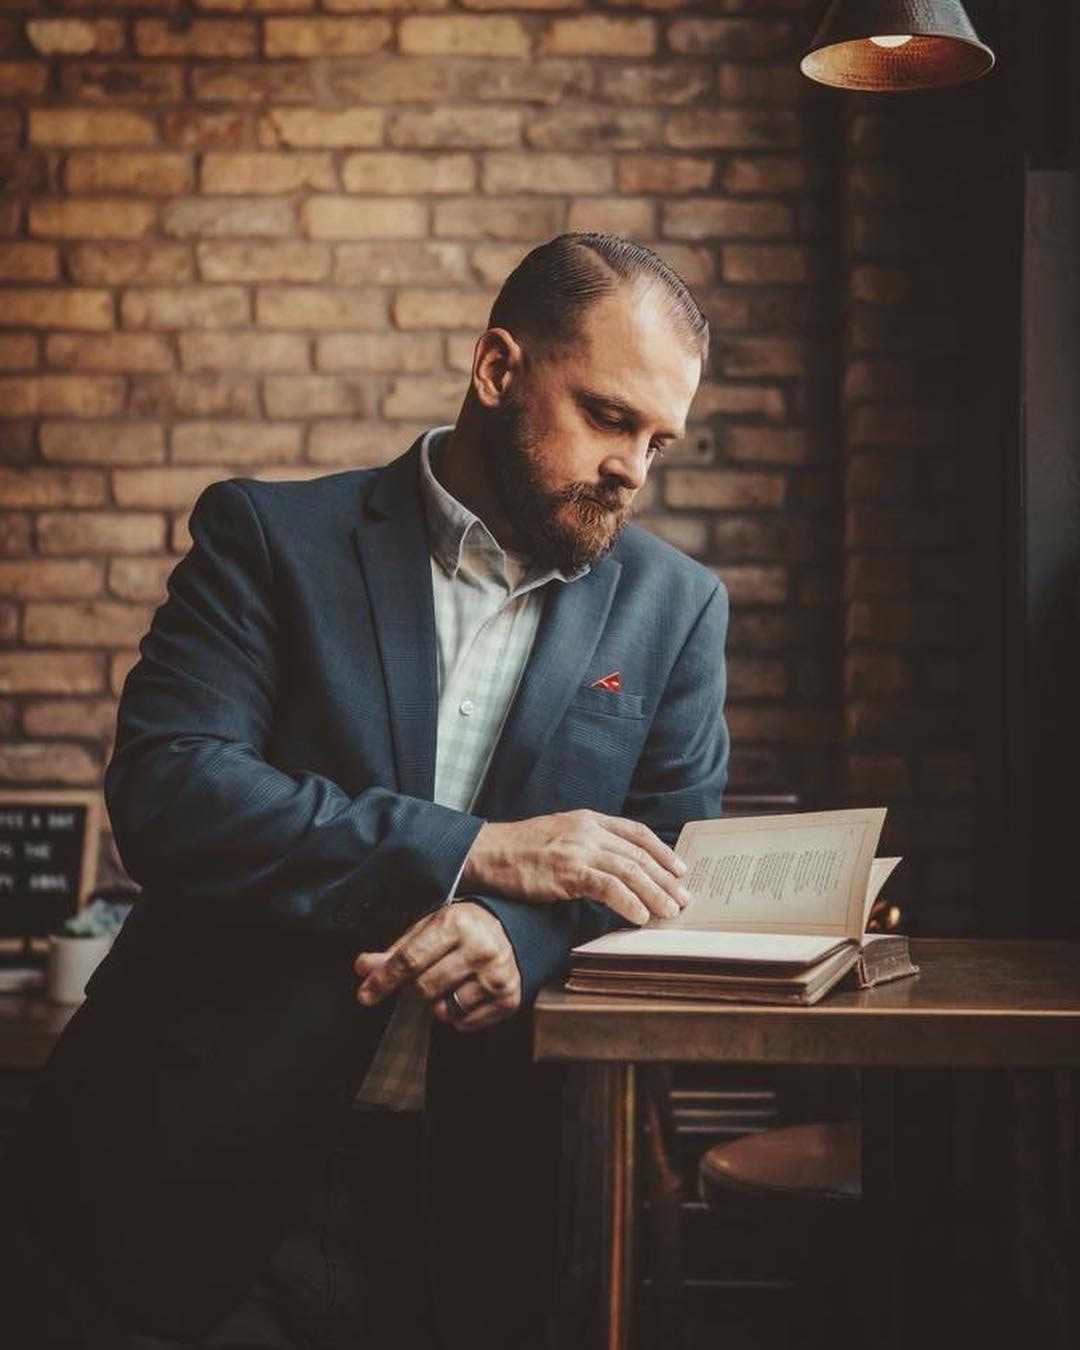 20. Back to the Wall Have your subject put his back to the wall looking into the camera or off into the distance. Try different perspectives. 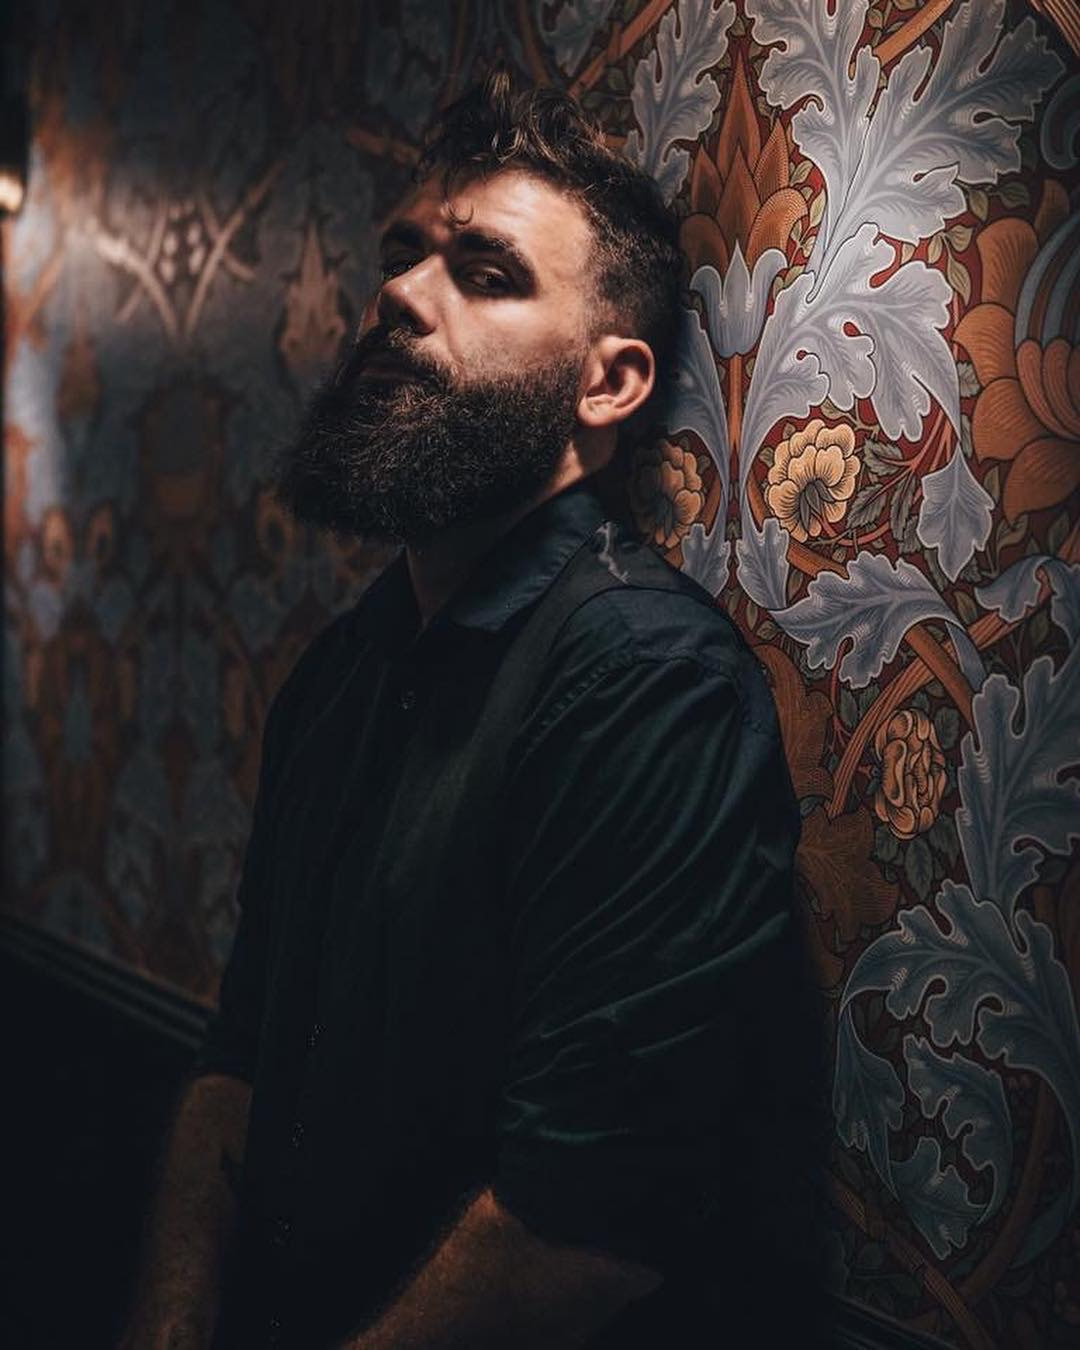 Model: @lifeofdylancruz on IG 21. Hand behind the Head Have your subject place one hand behind his head. Not too much bend in the neck. 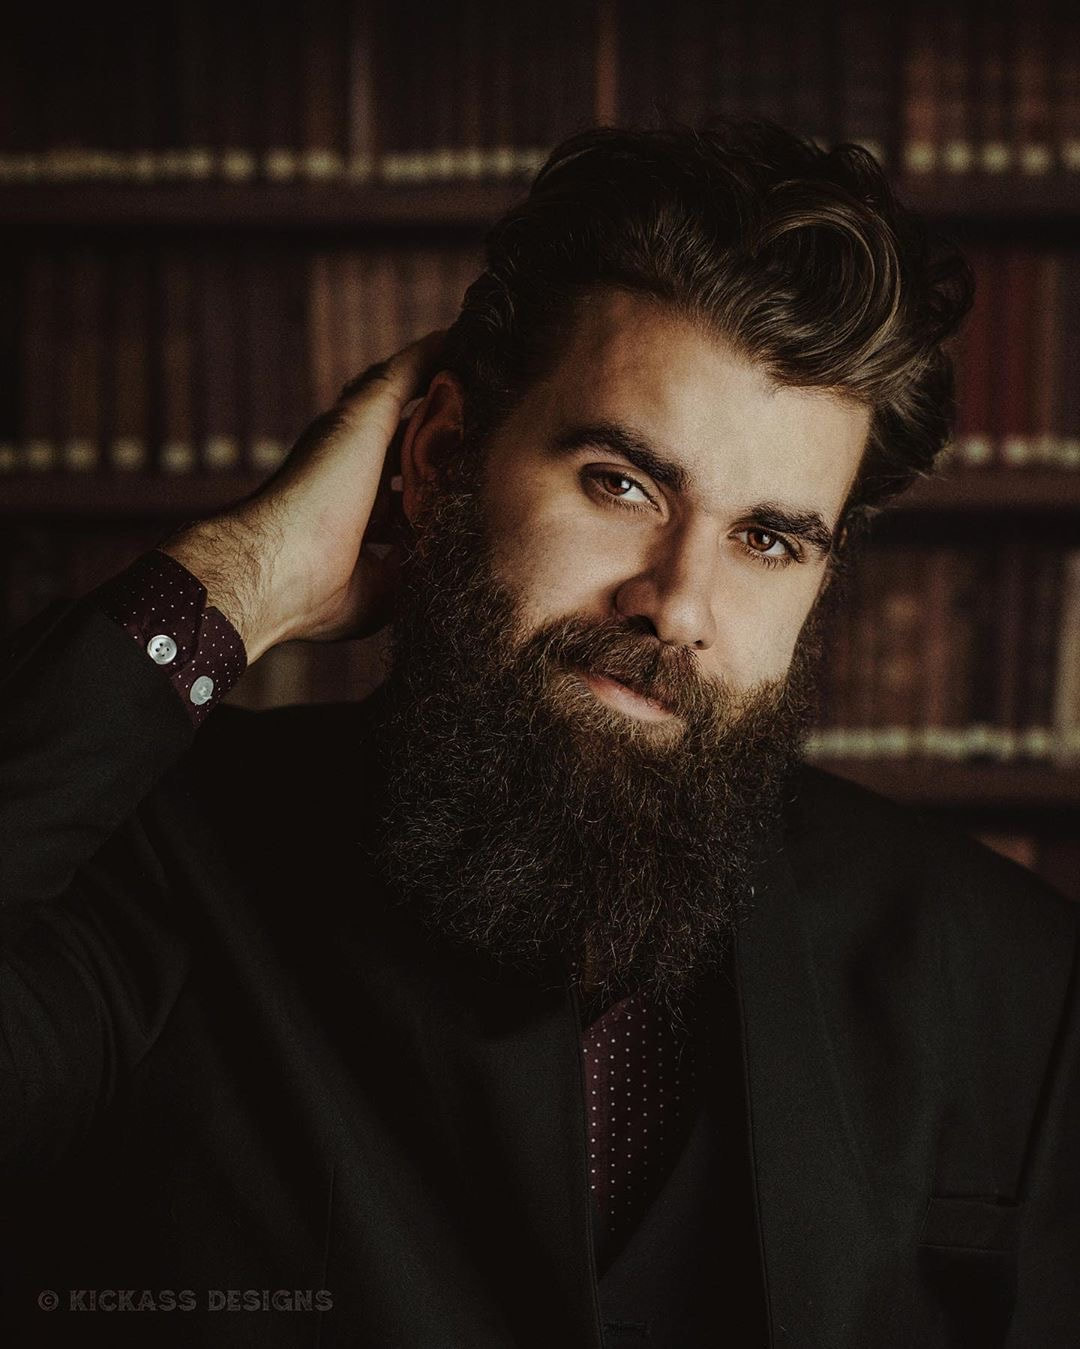 Model: @lifeofdylancruz on IG 22. Cover half the Face Have your model cover half his face with one or both hands. This brings all the focus to one eye. 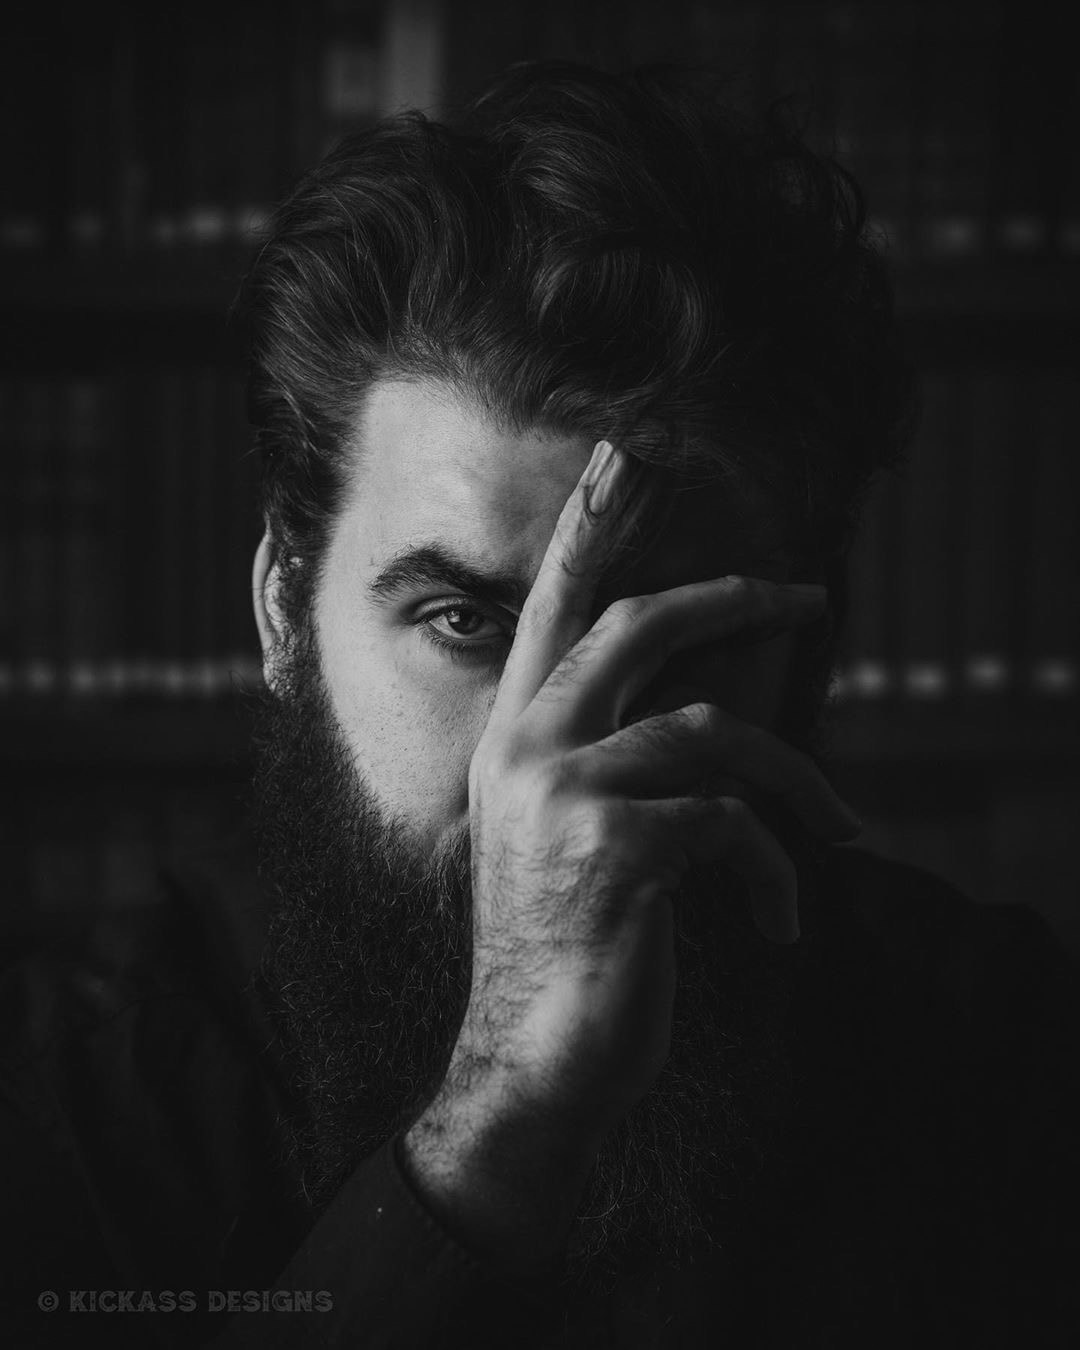 Model: @lifeofdylancruz on IG 23. Sit one leg Under Have your subject sit on the ground with one leg under the other. Resting one elbow on the knee and the forearm on the thigh. 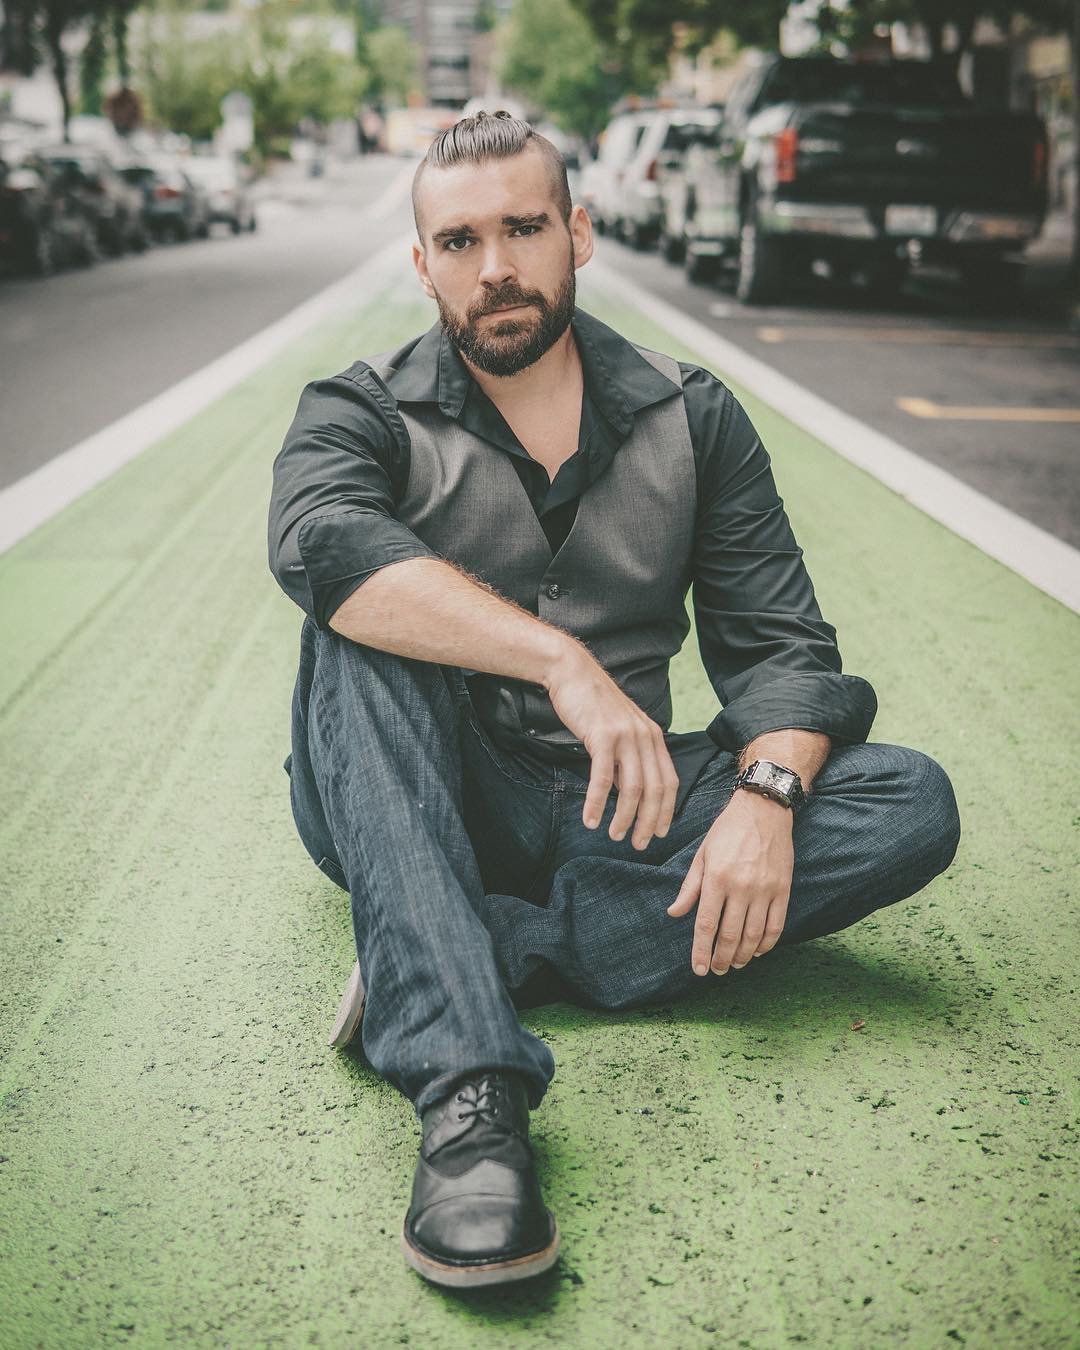 Model: @bearded_ragnarok on IG 24. Hands Behind the Back Have your subject place both hands behind their back, hands in butt pockets. 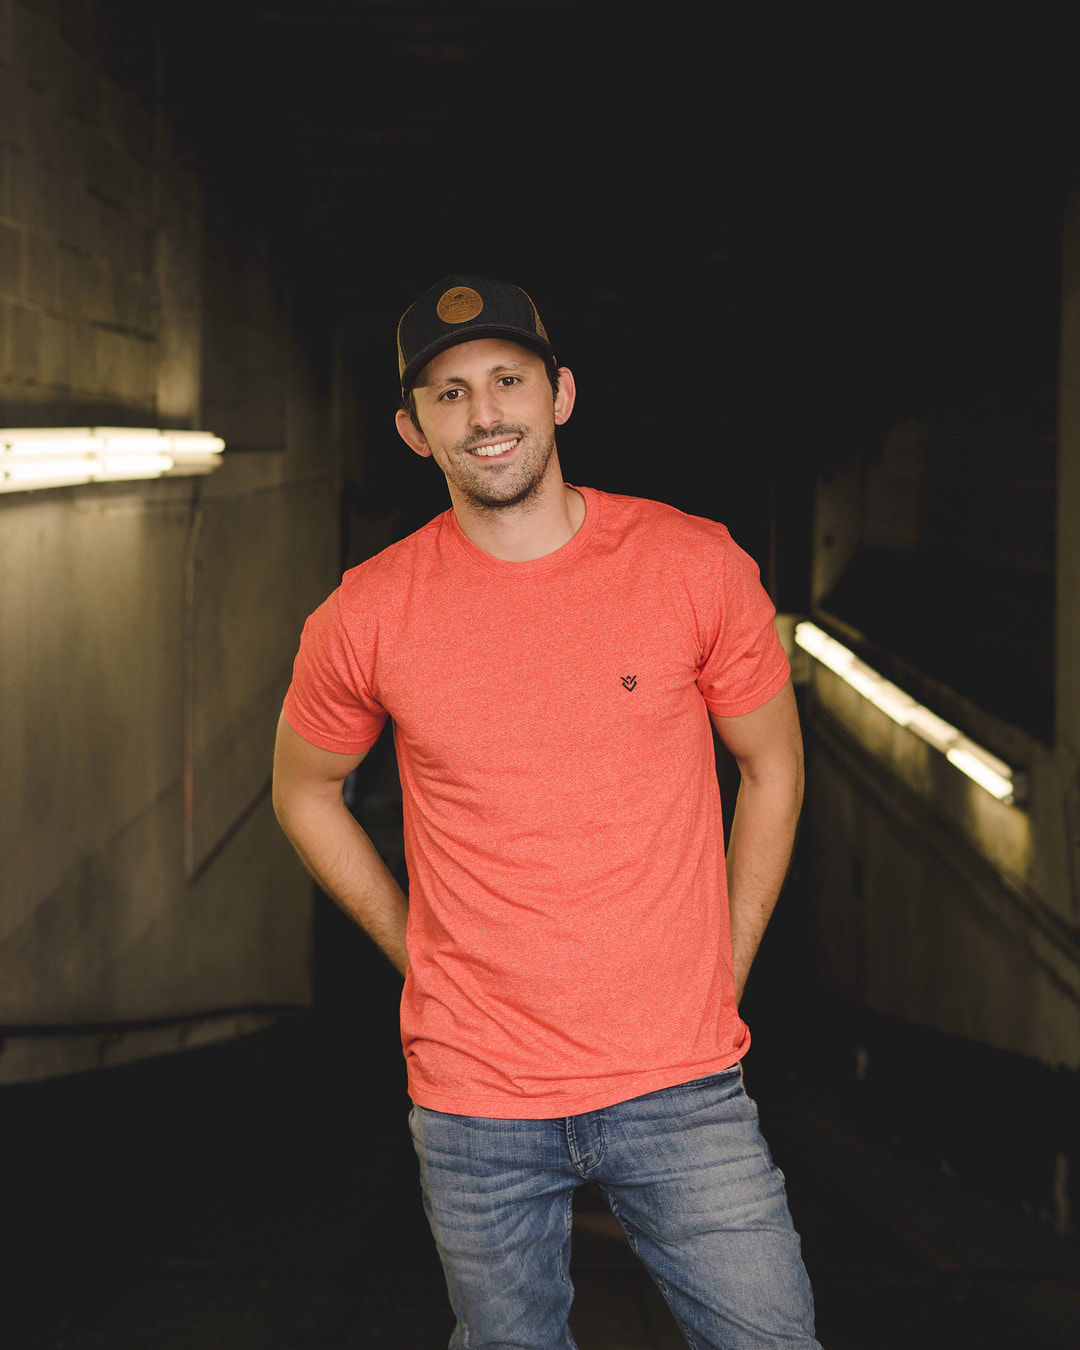 25. Sitting Pose When having your subject sit on steps try different perspectives and have one foot higher than the other rather than both feet on the same step. 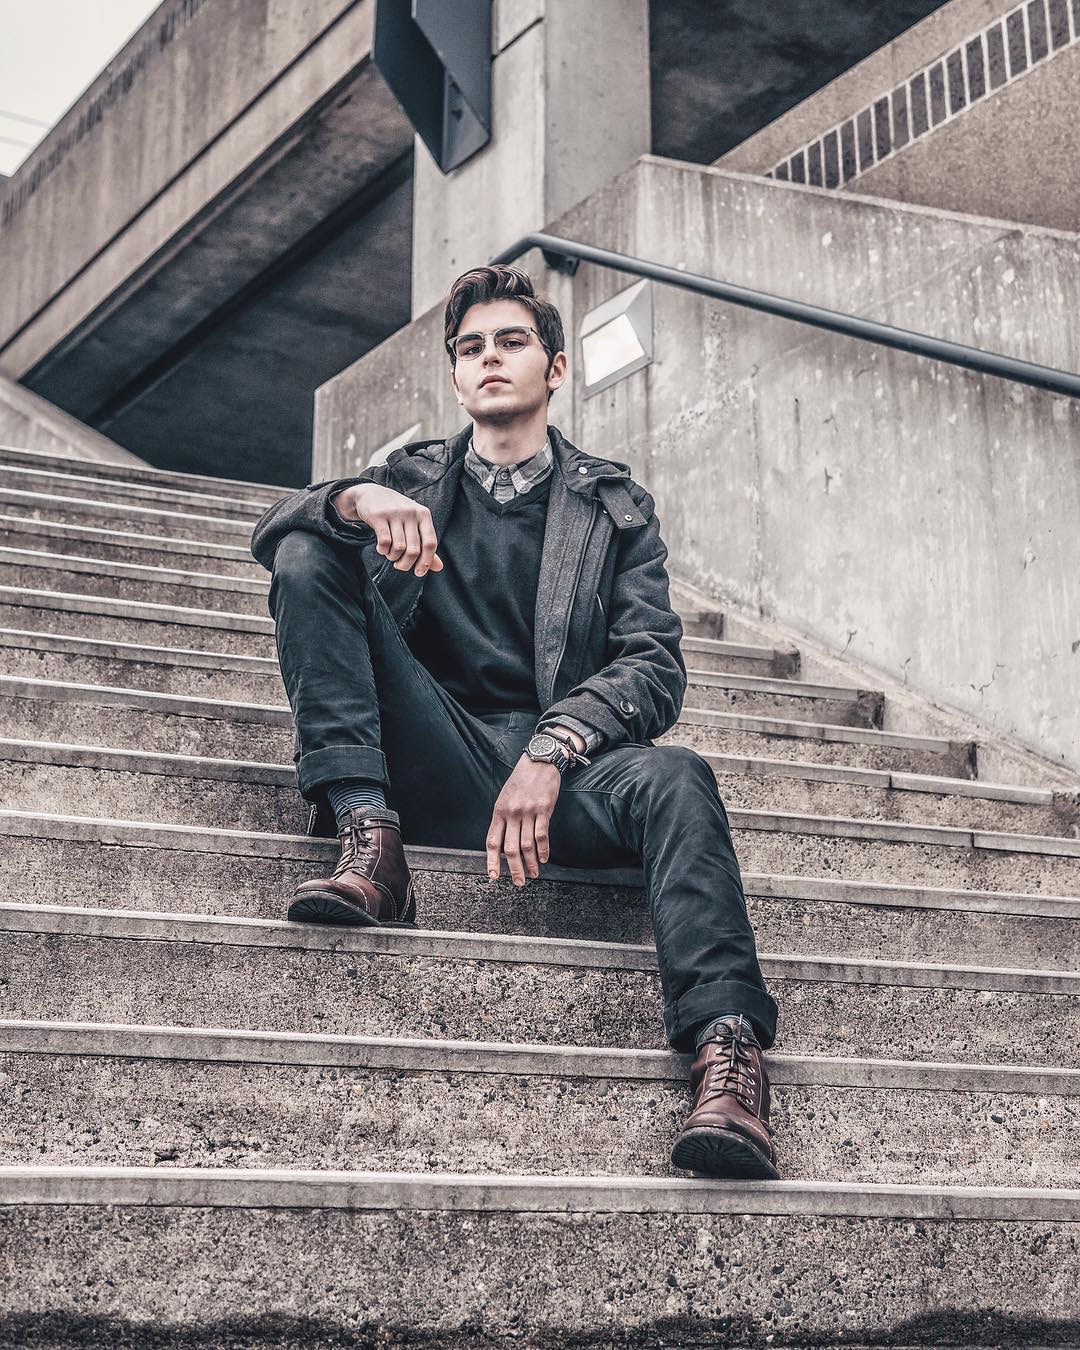 Model: @quinngilronan on IG 26. Candid Walking Pose Have your subject walk a straight line down the side walk. Make sure he is walking casually, naturally and not looking into the camera. Try shooting from the side and slightly up from a lower angle. 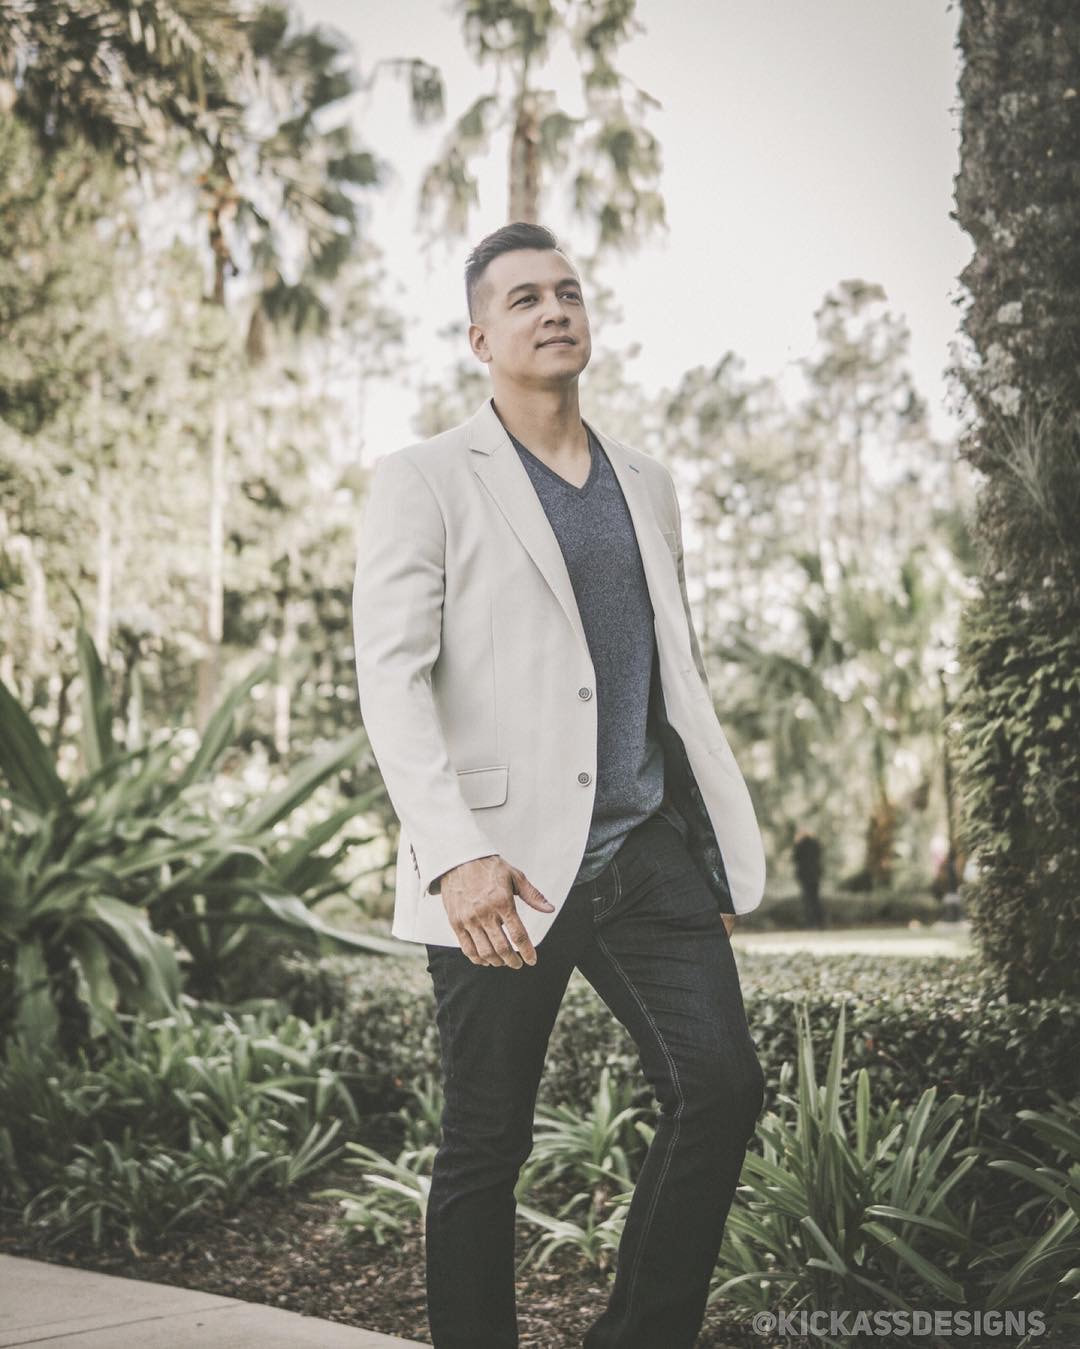 Model: @growwithtim on IG 27. One hand on Shoulder. Have your subject look into the camera while placing one hand on his shoulder. 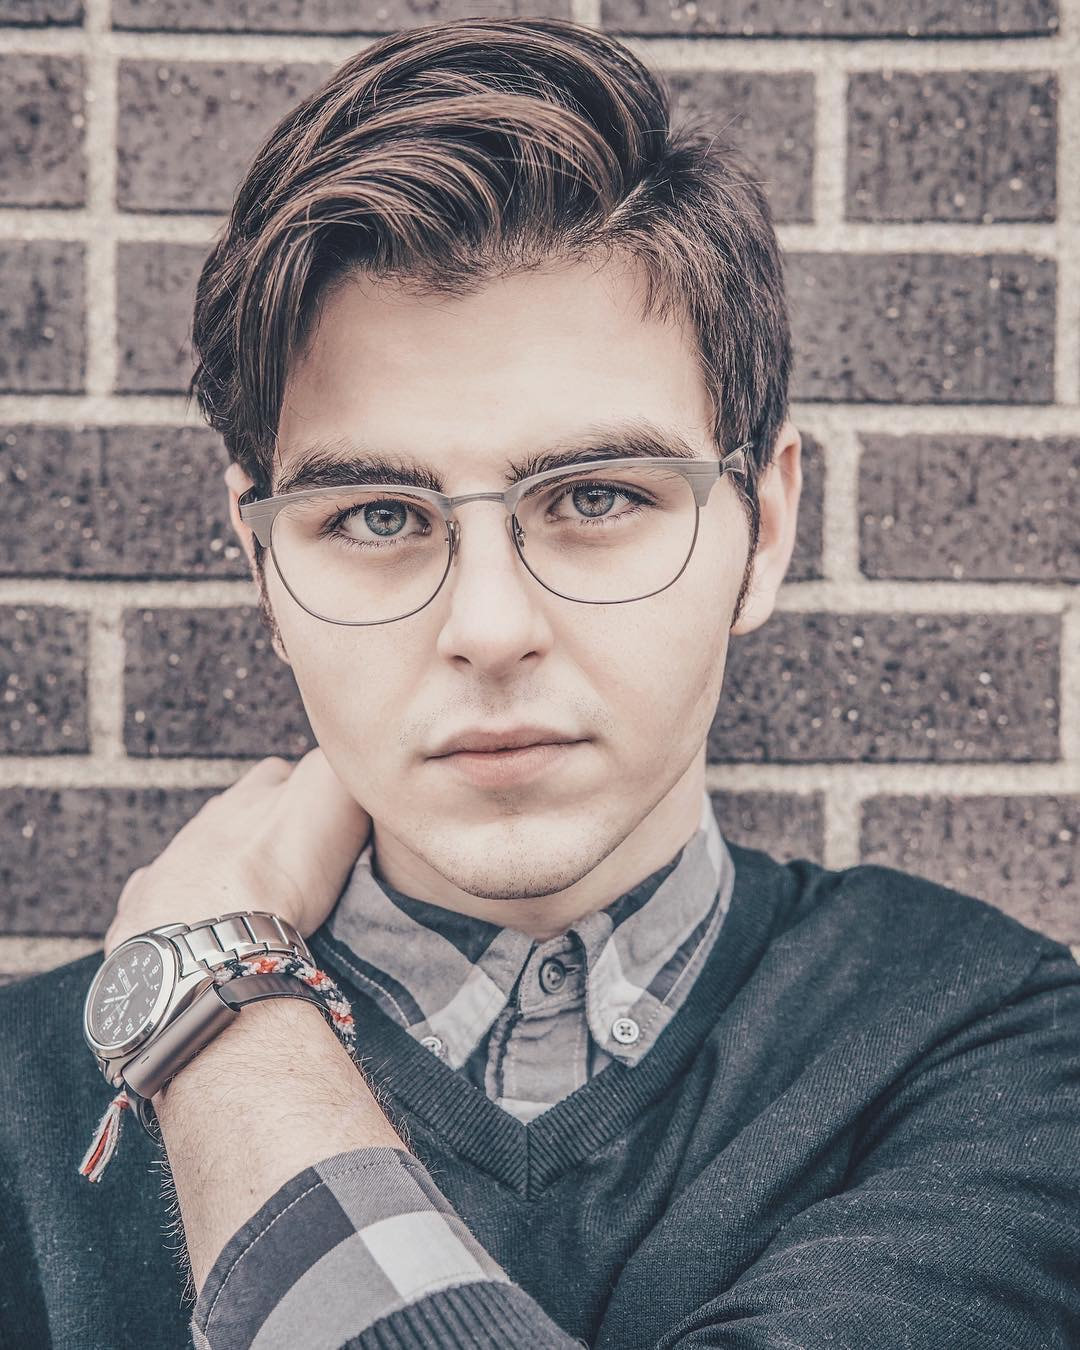 Model: @quinngilronan on IG |
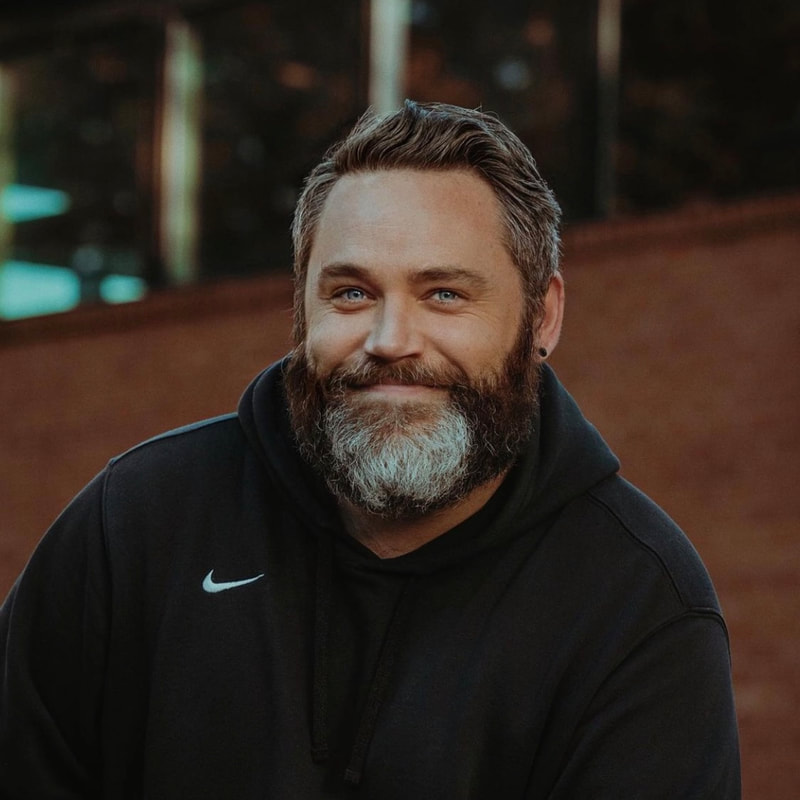
Author Lance Reis
Most Popular Articles
27 Posing ideas for women
27 Posing Ideas for Men Location Scouting 33 Must See Castles in the US How to grow your Instagram Low Light Photography Tips Photography for Beginners Free Resources Take Better Cosplay Photos Categories
All

|
 RSS Feed